
Building an Application with Kotlin Spring Boot / Spring Framework
This guide is meant to give you a quick taste of Kotlin and Spring Boot. you want to create your own Spring Boot-based project, visit Spring Initializr, fill in your project details, pick your options, and download a bundled up project as a zip file.
What You Will build
You will build a simple web application with Kotlin Spring Boot and add some useful services to it.
What You Need
- Install Intellij IDEA
- Java 21
- Kotlin
- Gradle 7.5+ or Maven 3.5+
- Install PostgreSQL and setup your database
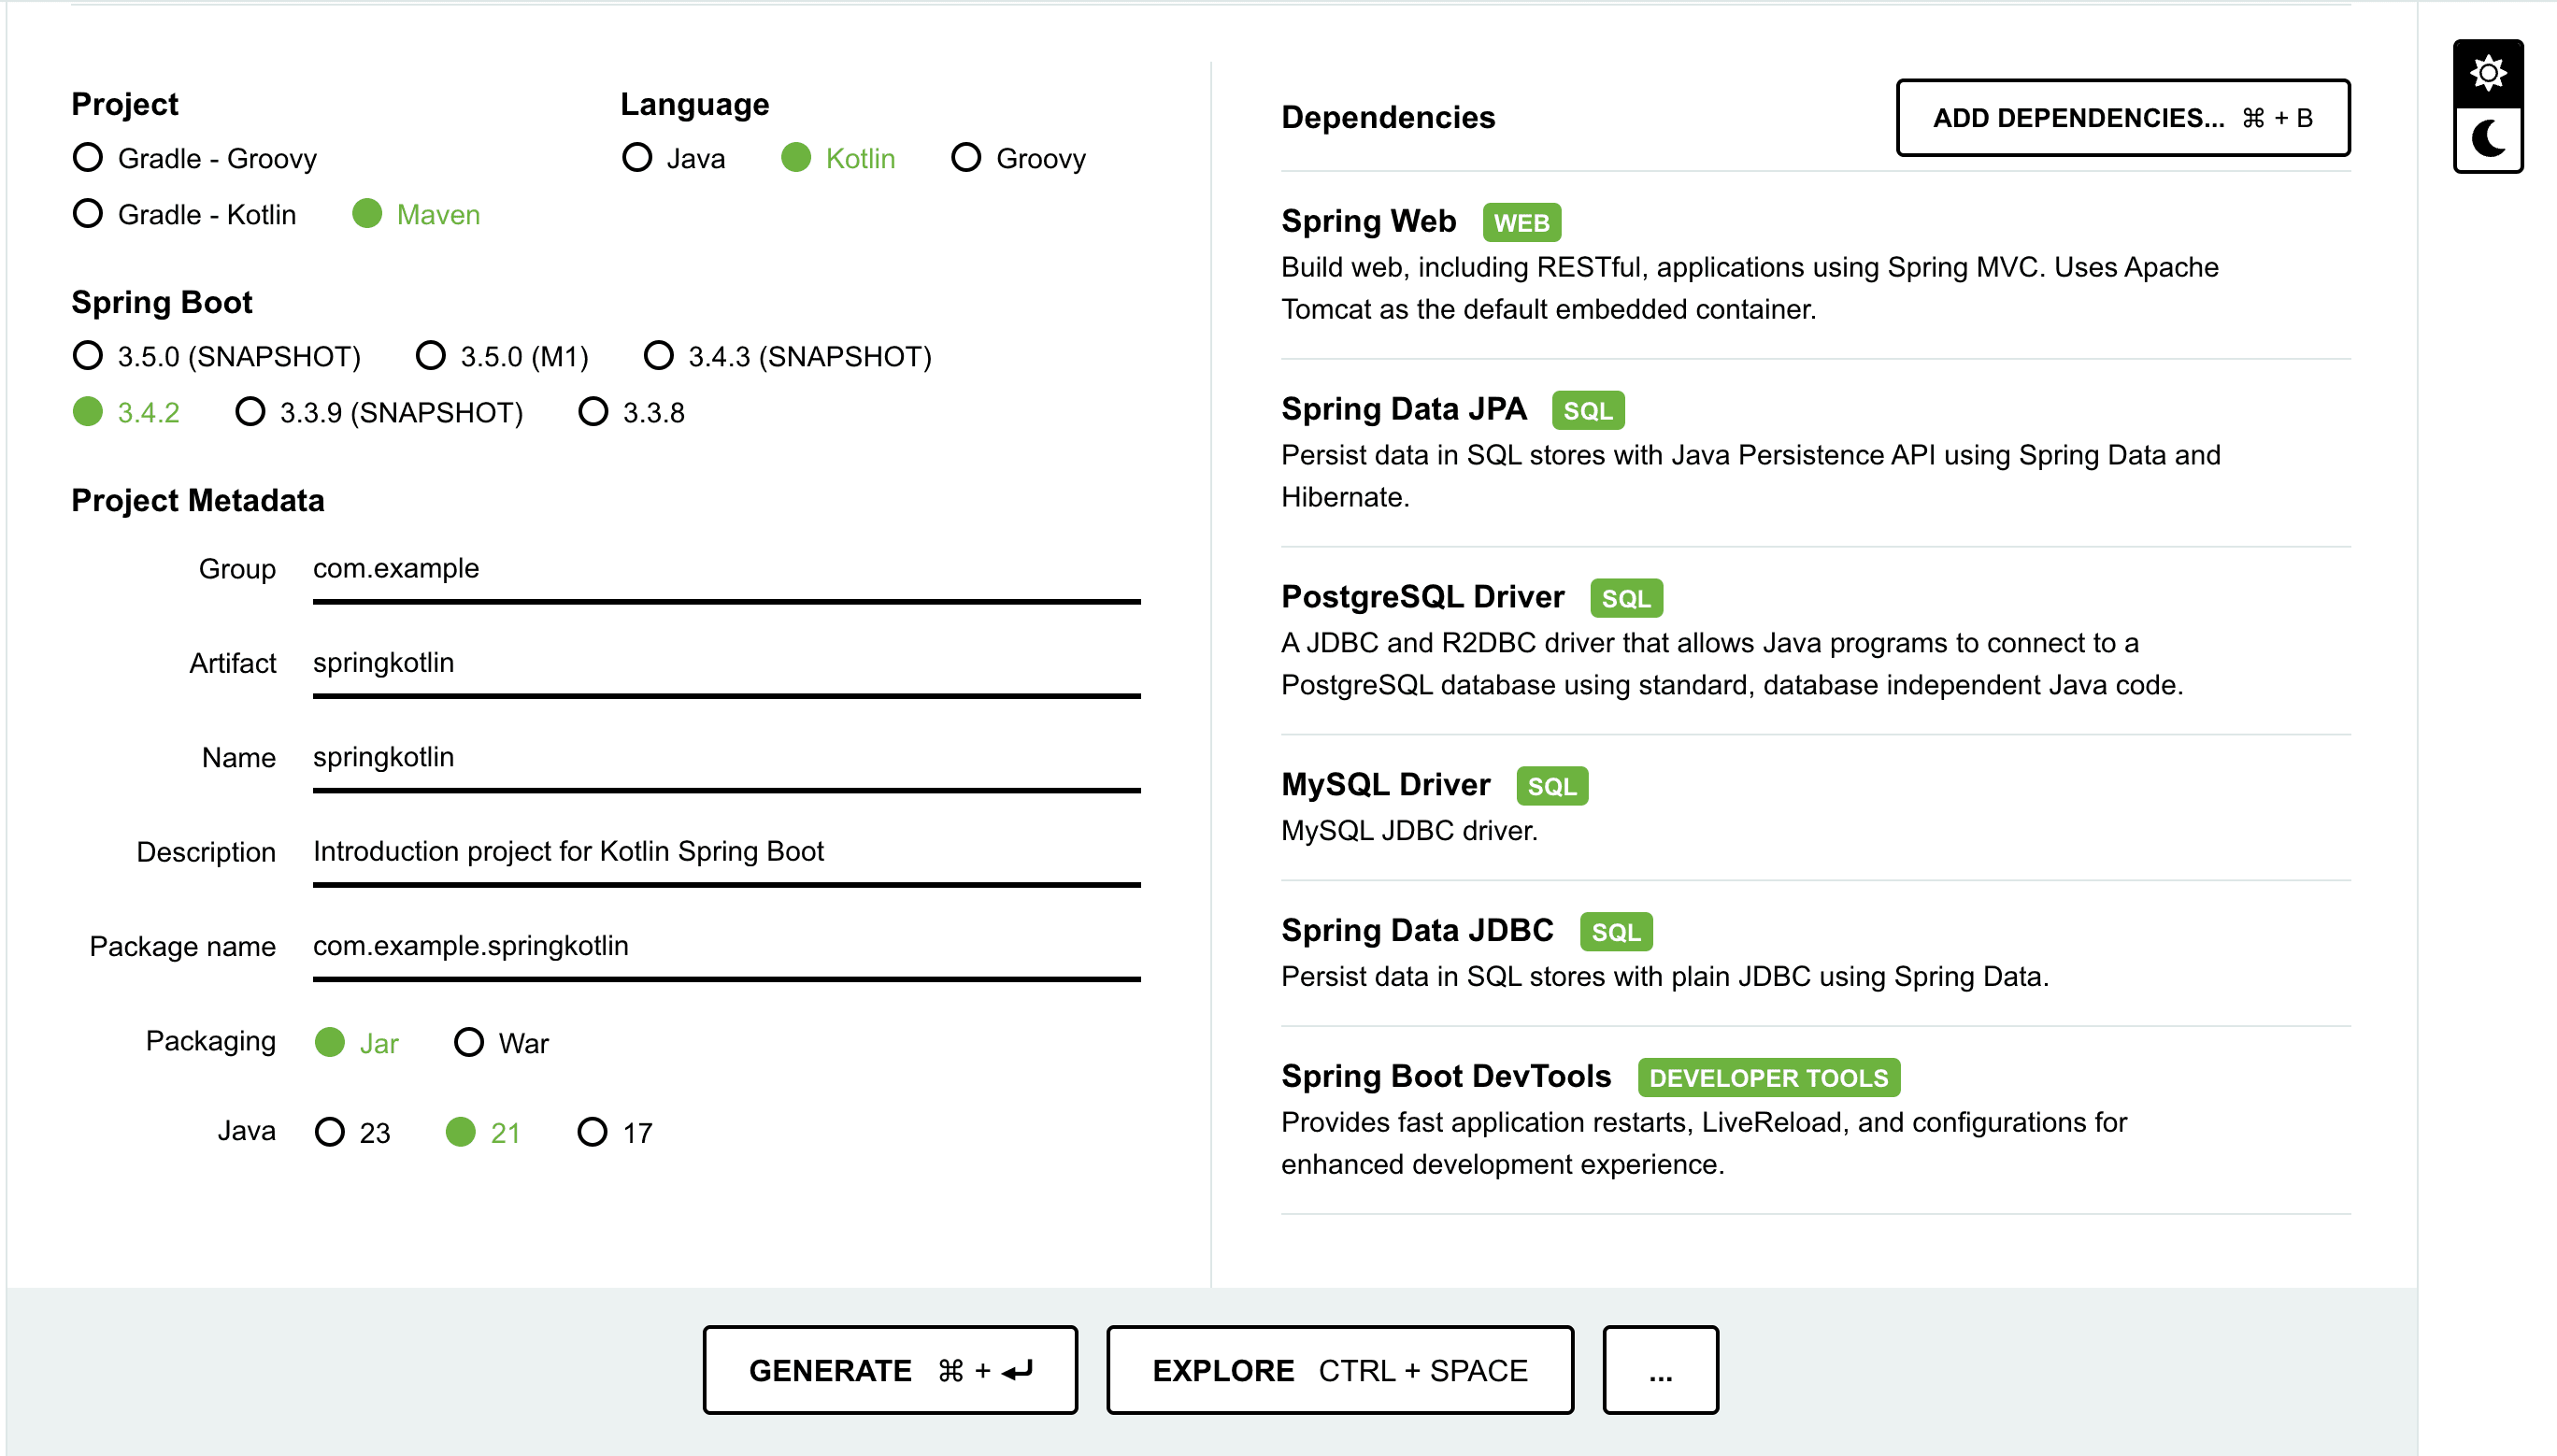
Starting with Spring Initializr
To manually initialize the project:
- Navigate to https://start.spring.io. This service pulls in all the dependencies you need for an application and does most of the setup for you.
- Choose either Gradle or Maven and the language you want to use. This guide assumes that you chose Kotlin.
- Click Dependencies and select Spring Web and Spring Data JPA and choose one of your database driver:
- PostgreSQL Driver (this guide is using this)
- MariaDB Driver
- MySQL Driver
- Click Generate.
- Download the resulting ZIP file, which is an archive of a web application that is configured with your choices.
Project Installation
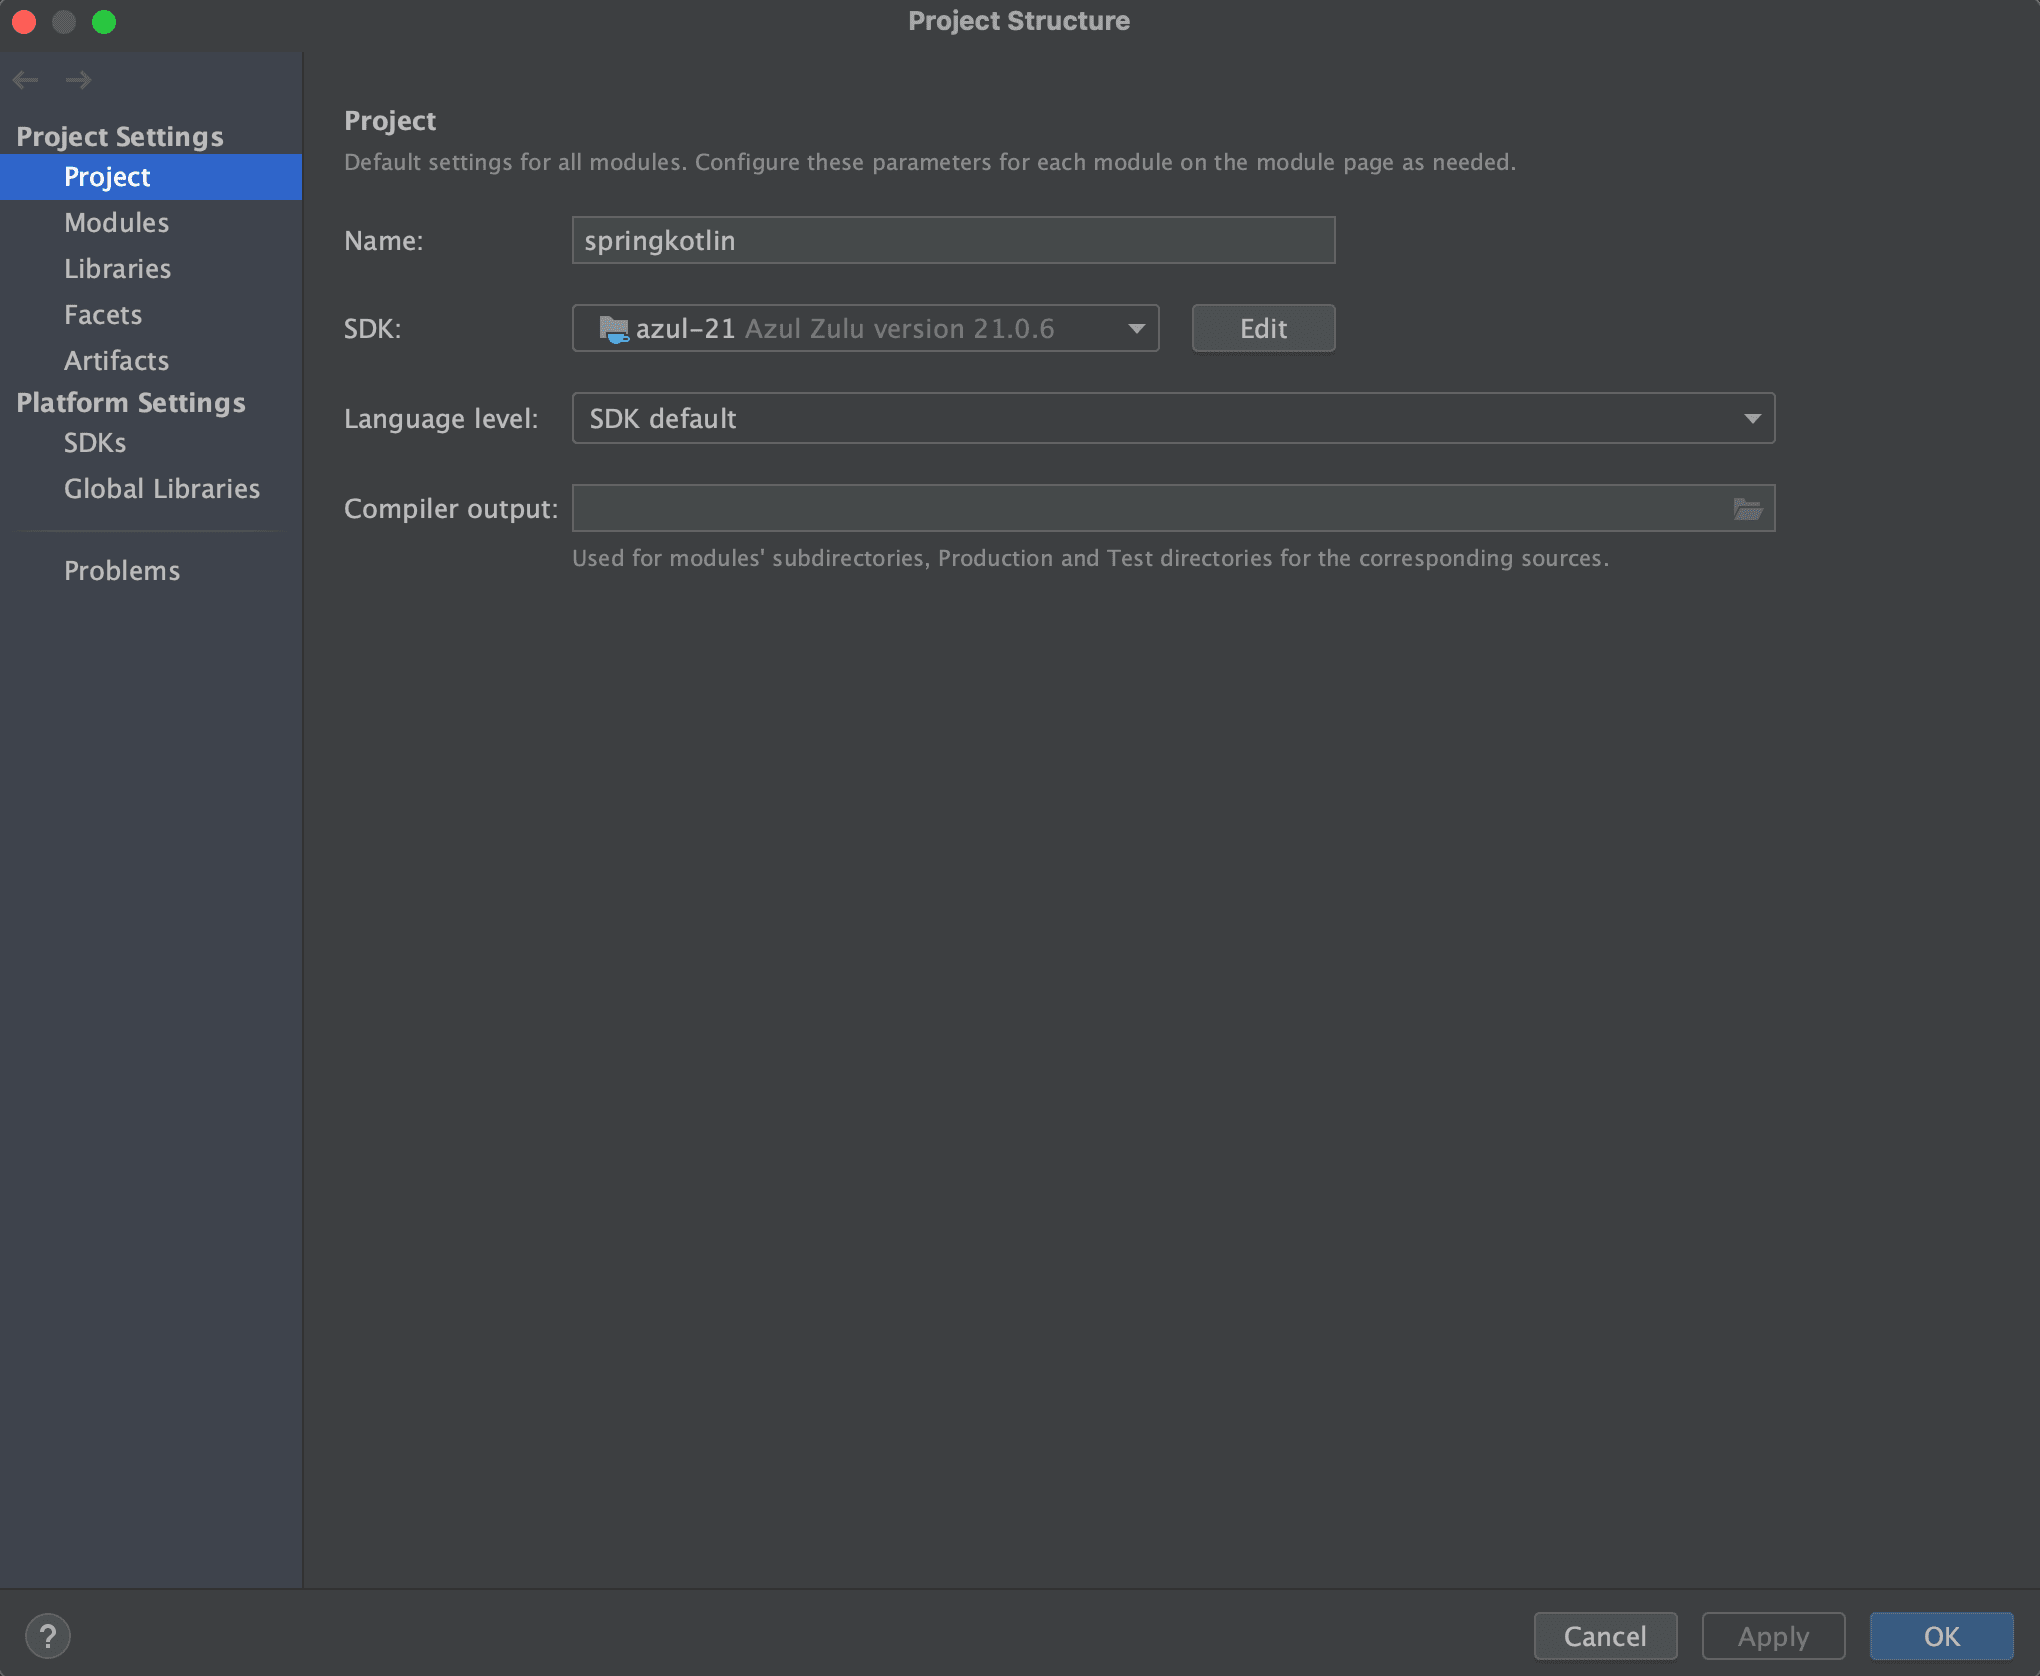
- Unzip it and open with IntelliJ IDEA
- Ensure your Project Structure in Intellij is using Java 21
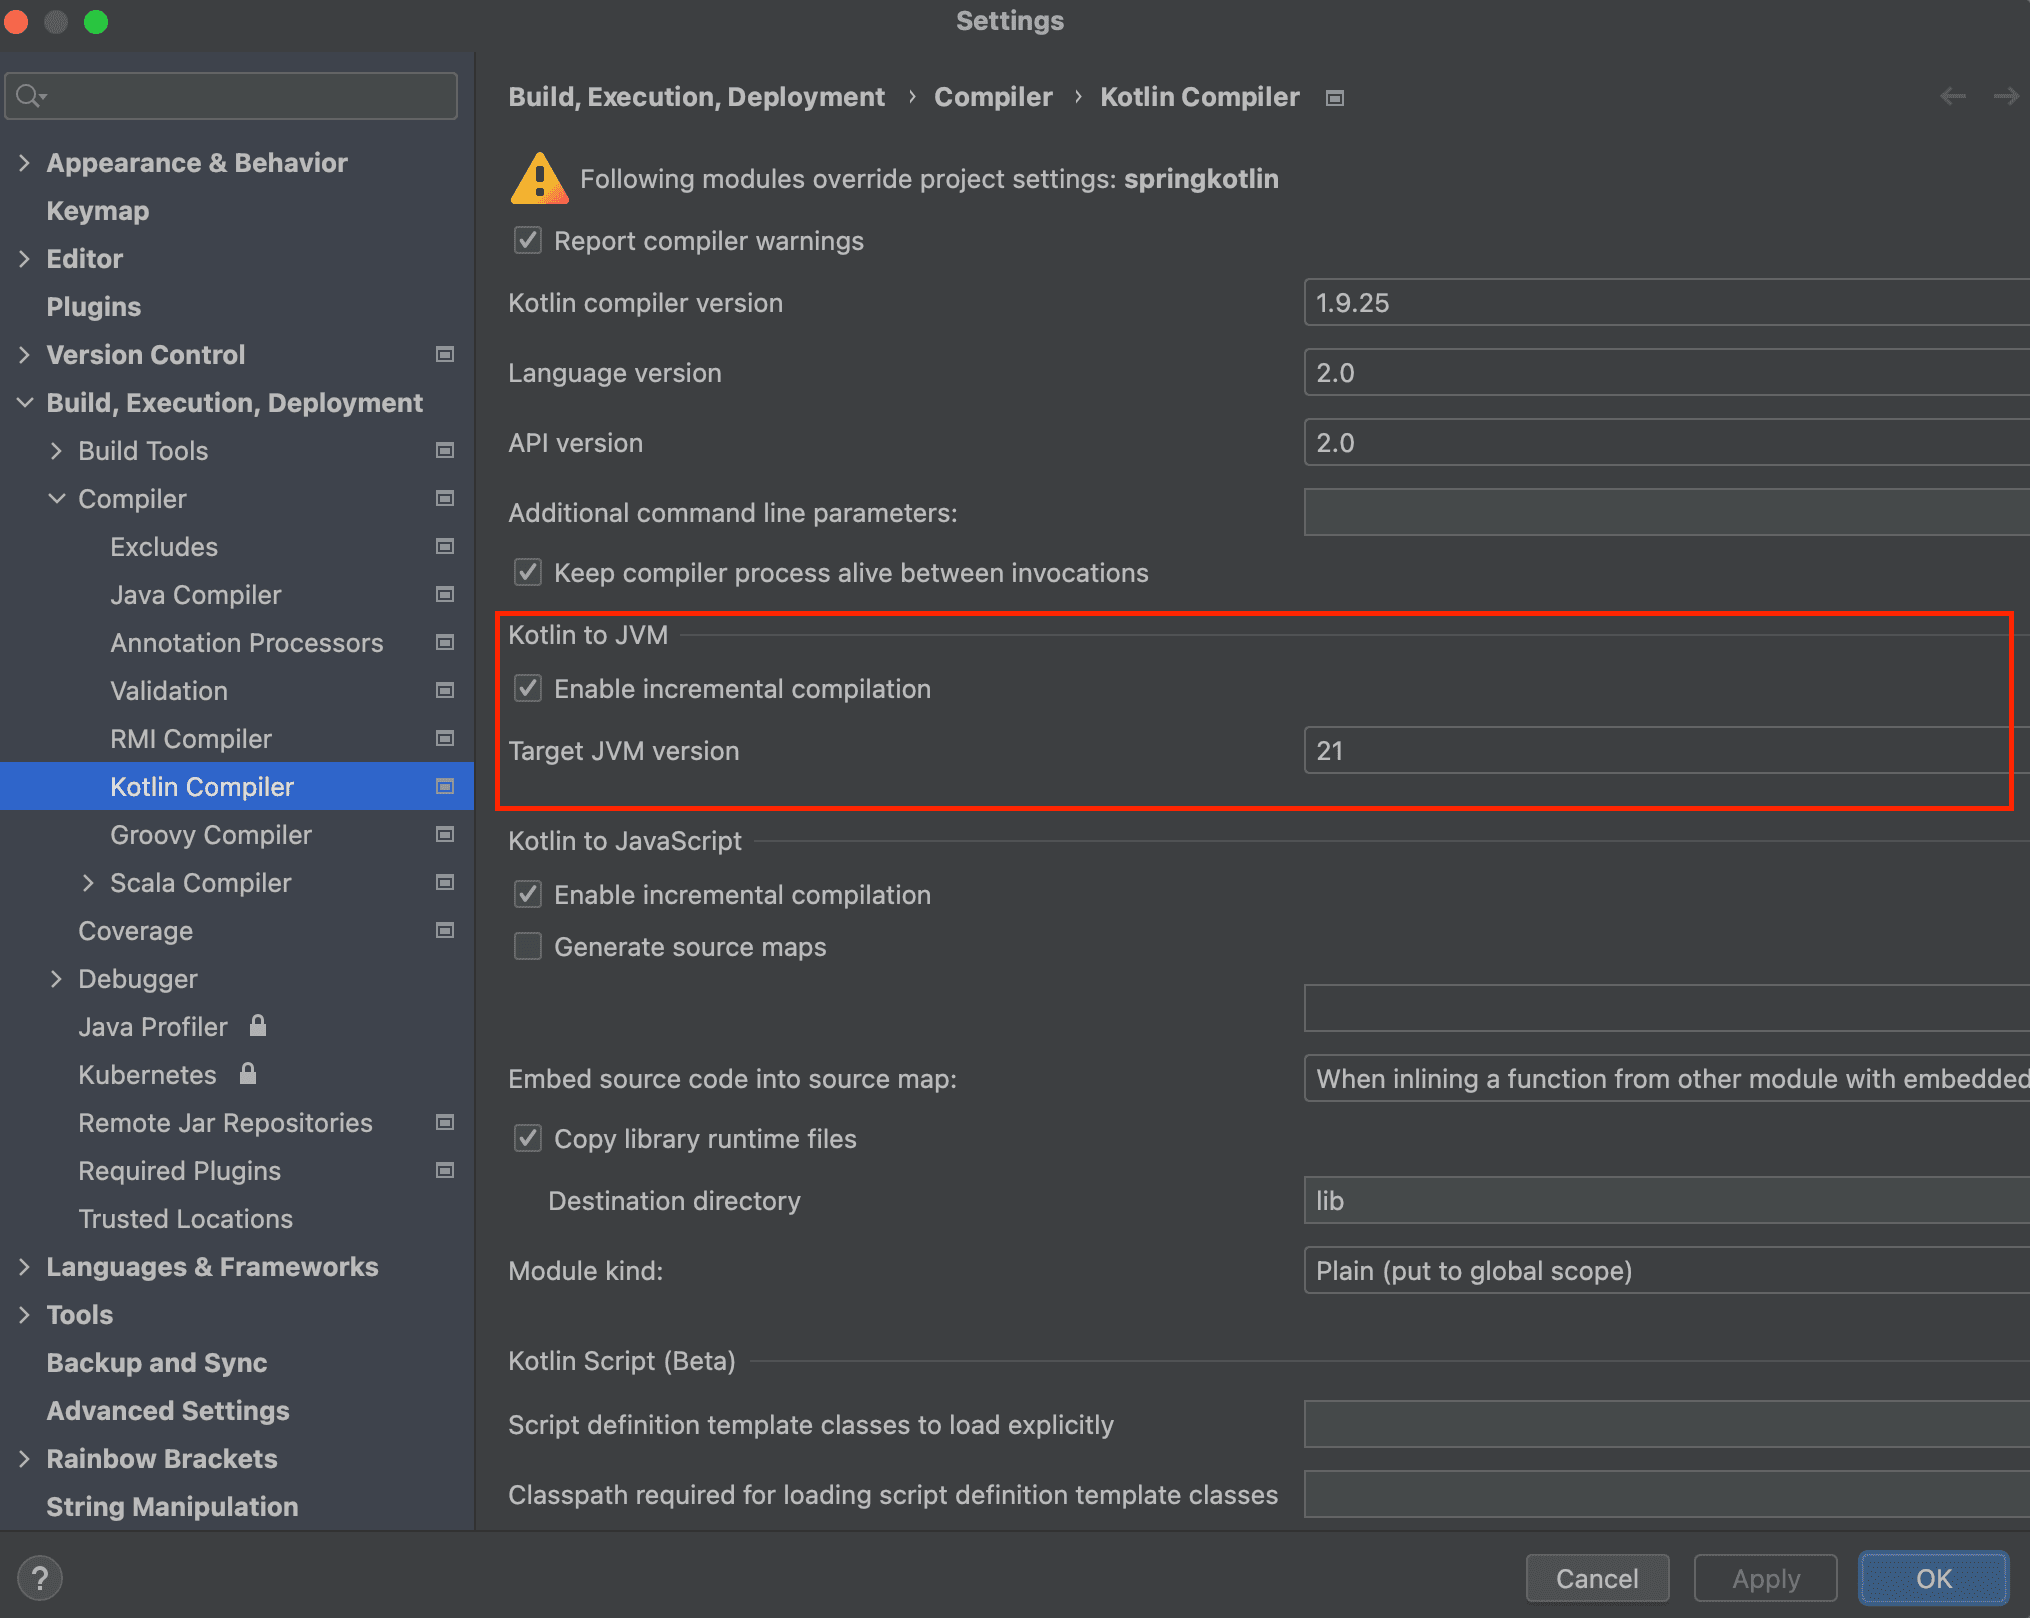
- Ensure your setting Kotlin to JVM is using JVM 21
- Please wait for a few minutes or seconds. Intellij will download all the project dependencies.
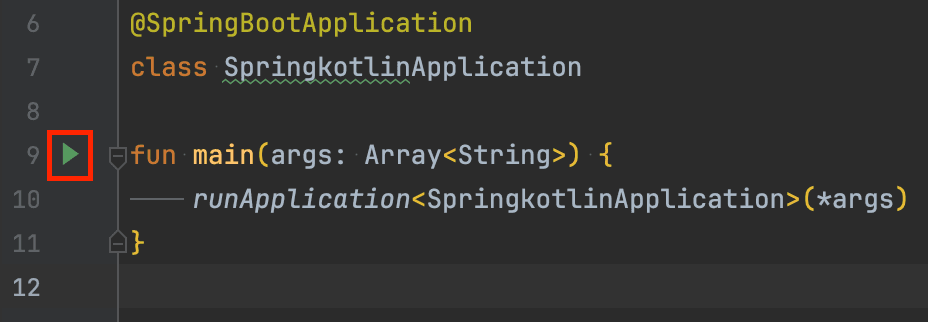
- Check your intellij looks ready to run with play button like below.
- Create table in your postgresql database
CREATE TABLE student (
    id SERIAL PRIMARY KEY,
    full_name VARCHAR(255),
    nick_name VARCHAR(255),
    email VARCHAR(255),
    address VARCHAR(255),
    city VARCHAR(255),
    created_at TIMESTAMPTZ DEFAULT CURRENT_TIMESTAMP,
    created_by VARCHAR(255) NOT NULL,
  	updated_at TIMESTAMPTZ DEFAULT CURRENT_TIMESTAMP,
  	updated_by VARCHAR(255) NOT NULL
);
Create a Simple Web Application
in your pom.xml add this dependency
   <dependency>
      <groupId>org.springdoc</groupId>
      <artifactId>springdoc-openapi-starter-webmvc-ui</artifactId>
      <version>2.8.4</version>
   </dependency>
   <dependency>
      <groupId>com.fasterxml.jackson.module</groupId>
      <artifactId>jackson-module-kotlin</artifactId>
   </dependency>

  <dependency>
      <groupId>org.springframework.boot</groupId>
      <artifactId>spring-boot-starter-validation</artifactId>
  </dependency>
or add this dependency in your build.gradle
implementation 'org.springdoc:springdoc-openapi-starter-webmvc-ui:2.8.4'
implementation 'org.springframework.boot:spring-boot-starter-validation'
and then you can install it using mvn install or gradle build.
or using intellij click this button
using maven

using gradle

now setup your application.properties
spring.datasource.url=jdbc:postgresql://localhost:5432/<YOUR_DATABASE_NAME>?currentSchema=<SCHEMA_NAME>
spring.datasource.username=<YOUR_USERNAME>
spring.datasource.password=<YOUR_PASSWORD>
spring.datasource.driver-class-name=org.postgresql.Driver

spring.datasource.hikari.minimum-idle=2
spring.datasource.hikari.maximum-pool-size=3

spring.jpa.properties.hibernate.dialect=org.hibernate.dialect.PostgreSQLDialect
spring.jpa.show-sql=true
spring.jpa.hibernate.ddl-auto=update

# if you have been using postman for interacting with API, this is an alternative
# https://springdoc.org/
springdoc.swagger-ui.enabled=true
springdoc.api-docs.enabled=true
Now you can create a web controller for a simple web application, as the following listing (from src/main/kotlin/com/example/springkotlin/StudentController.kt) shows:
@RestController
class StudentController {

	@GetMapping("/student-list")
	fun getAllStudent(): String {
		return "Greetings from Kotlin Spring Boot!"
	}

}
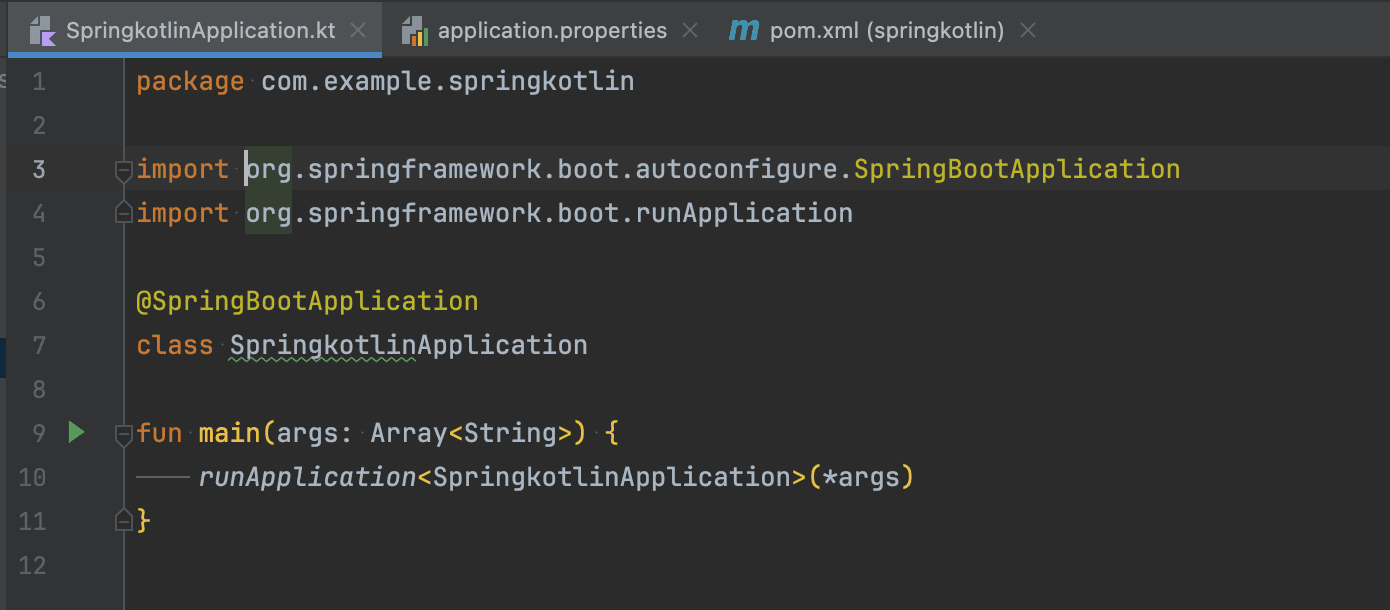
Click the play button here (SpringkotlinApplication.kt)
and should be running well like this

and you can see this message in your console or terminal
2025-02-02T10:02:43.546+07:00  INFO 26741 --- [springkotlin] [  restartedMain] o.h.e.t.j.p.i.JtaPlatformInitiator       : HHH000489: No JTA platform available (set 'hibernate.transaction.jta.platform' to enable JTA platform integration)
2025-02-02T10:02:43.568+07:00  INFO 26741 --- [springkotlin] [  restartedMain] j.LocalContainerEntityManagerFactoryBean : Initialized JPA EntityManagerFactory for persistence unit 'default'
2025-02-02T10:02:43.820+07:00  WARN 26741 --- [springkotlin] [  restartedMain] JpaBaseConfiguration$JpaWebConfiguration : spring.jpa.open-in-view is enabled by default. Therefore, database queries may be performed during view rendering. Explicitly configure spring.jpa.open-in-view to disable this warning
2025-02-02T10:02:44.712+07:00  INFO 26741 --- [springkotlin] [  restartedMain] o.s.b.d.a.OptionalLiveReloadServer       : LiveReload server is running on port 35729
2025-02-02T10:02:44.736+07:00  INFO 26741 --- [springkotlin] [  restartedMain] o.s.b.w.embedded.tomcat.TomcatWebServer  : Tomcat started on port 8080 (http) with context path '/'
2025-02-02T10:02:44.747+07:00  INFO 26741 --- [springkotlin] [  restartedMain] c.e.s.SpringkotlinApplicationKt          : Started SpringkotlinApplicationKt in 6.598 seconds (process running for 7.741)
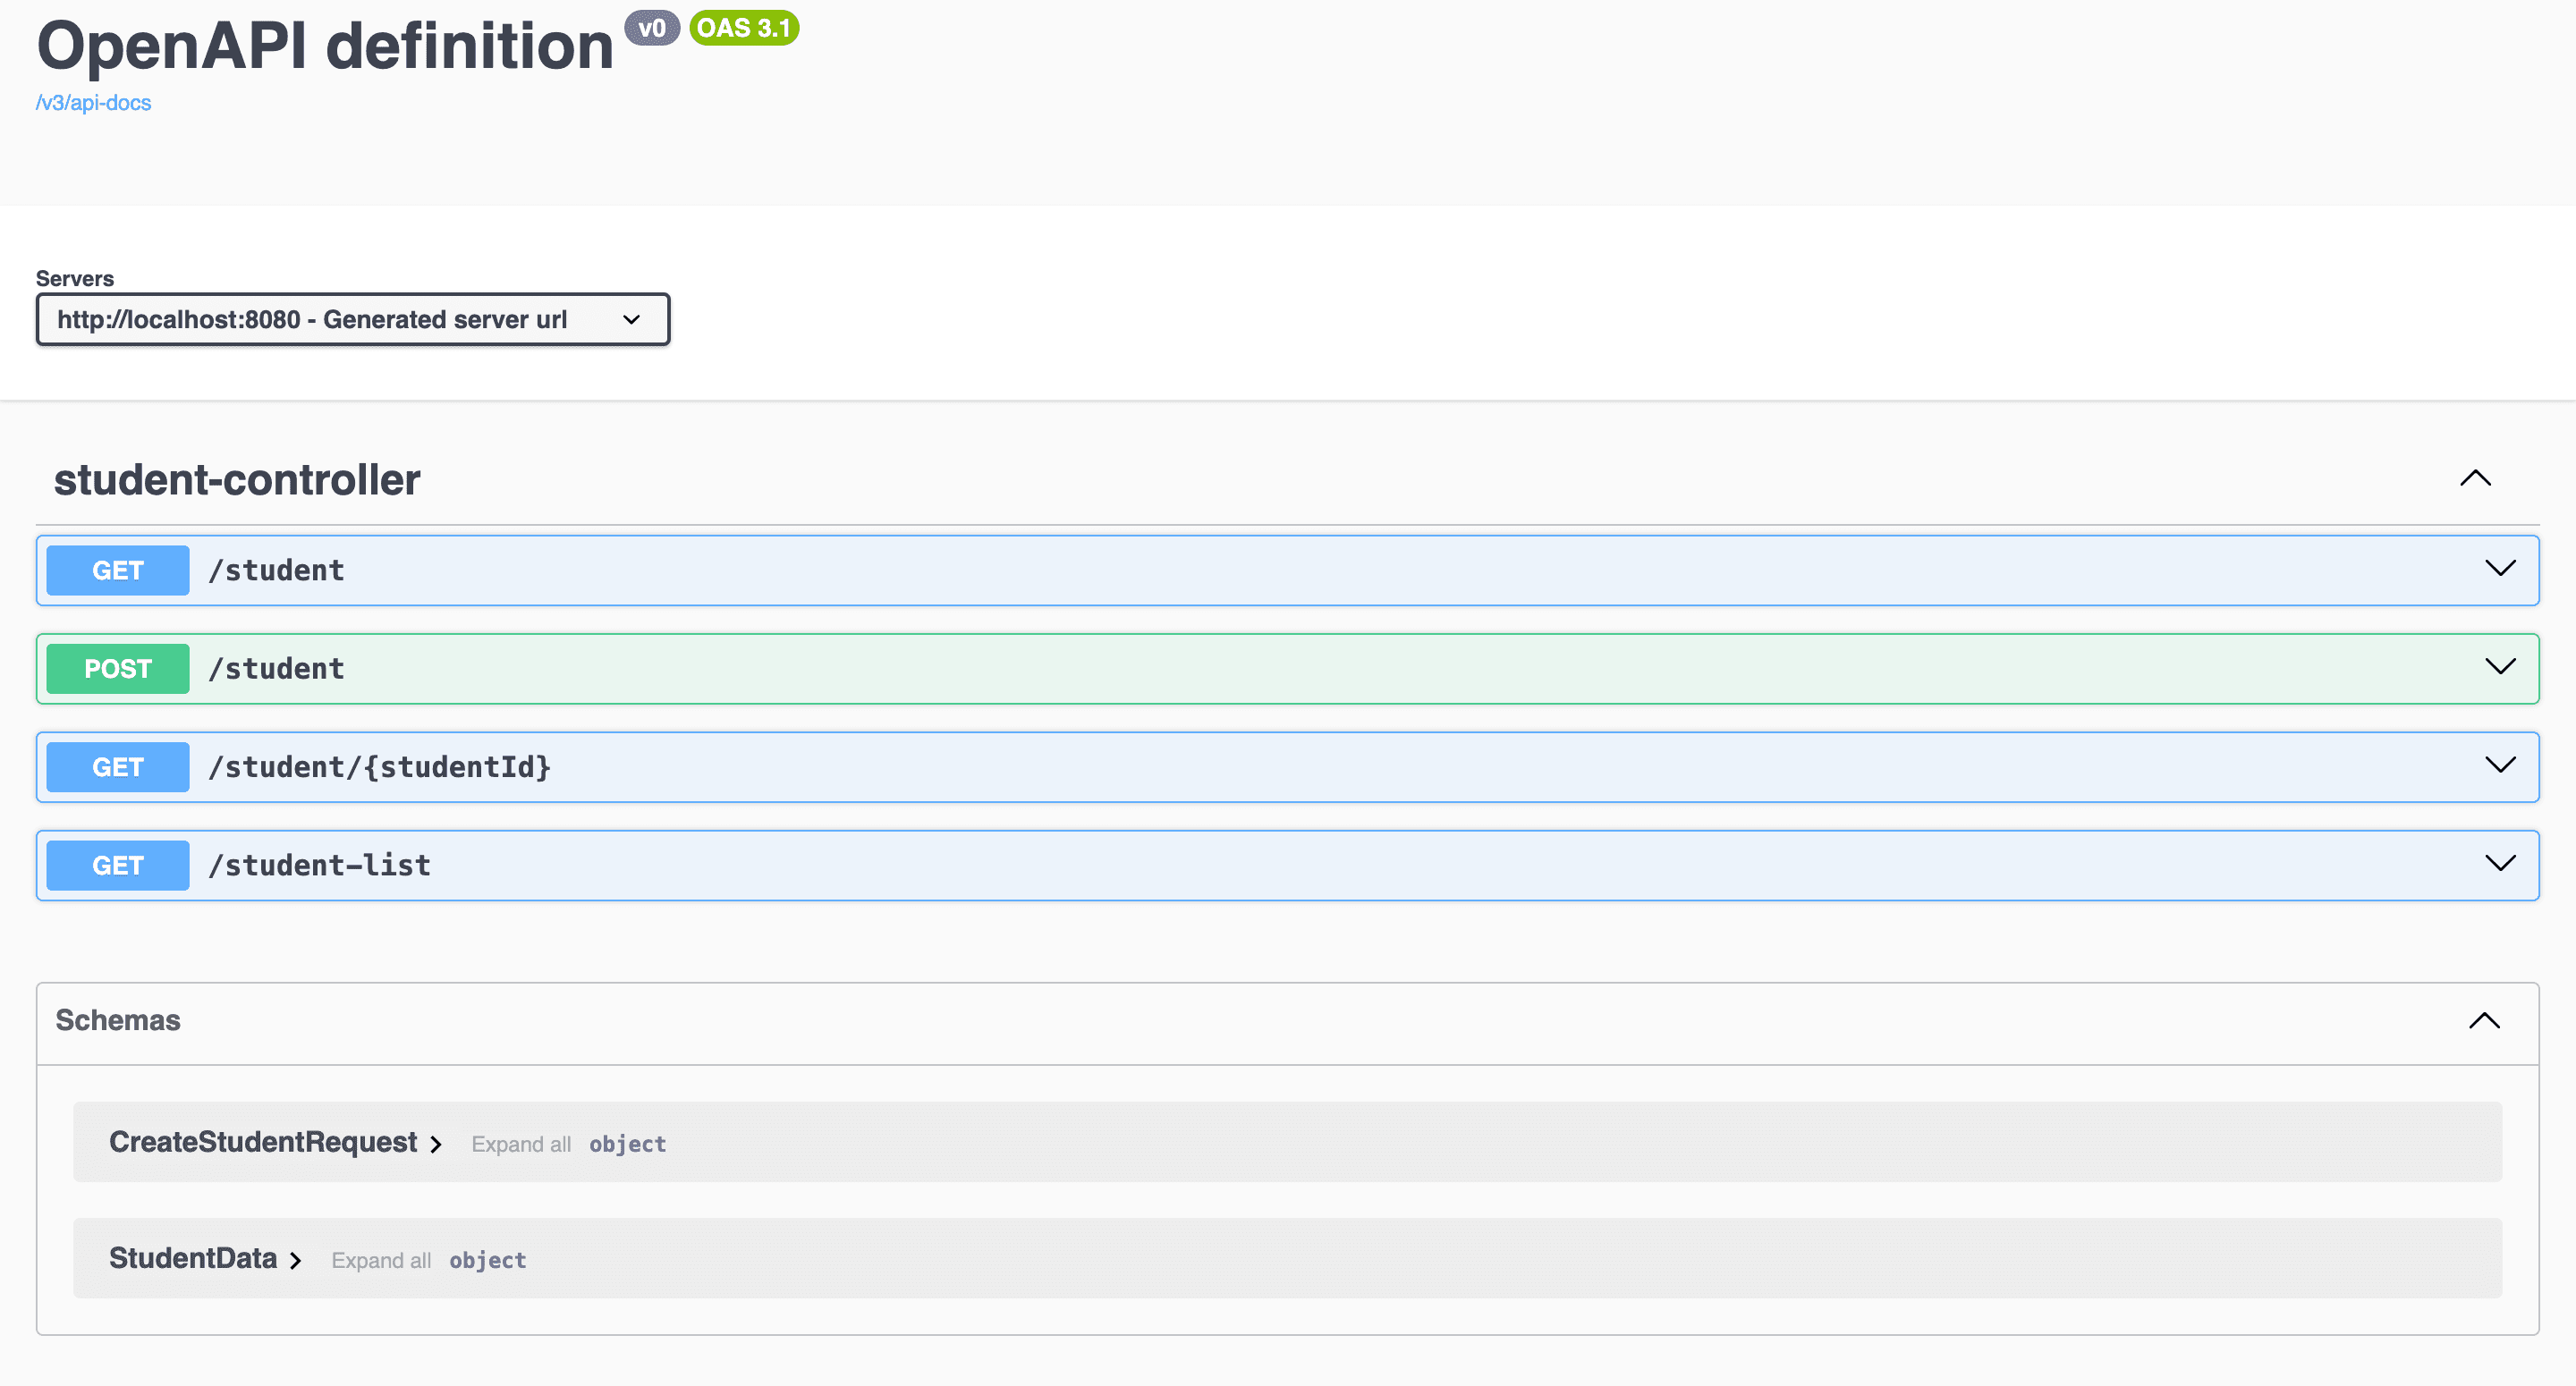
Go to here http://localhost:8080/swagger-ui/index.html and you should see like this
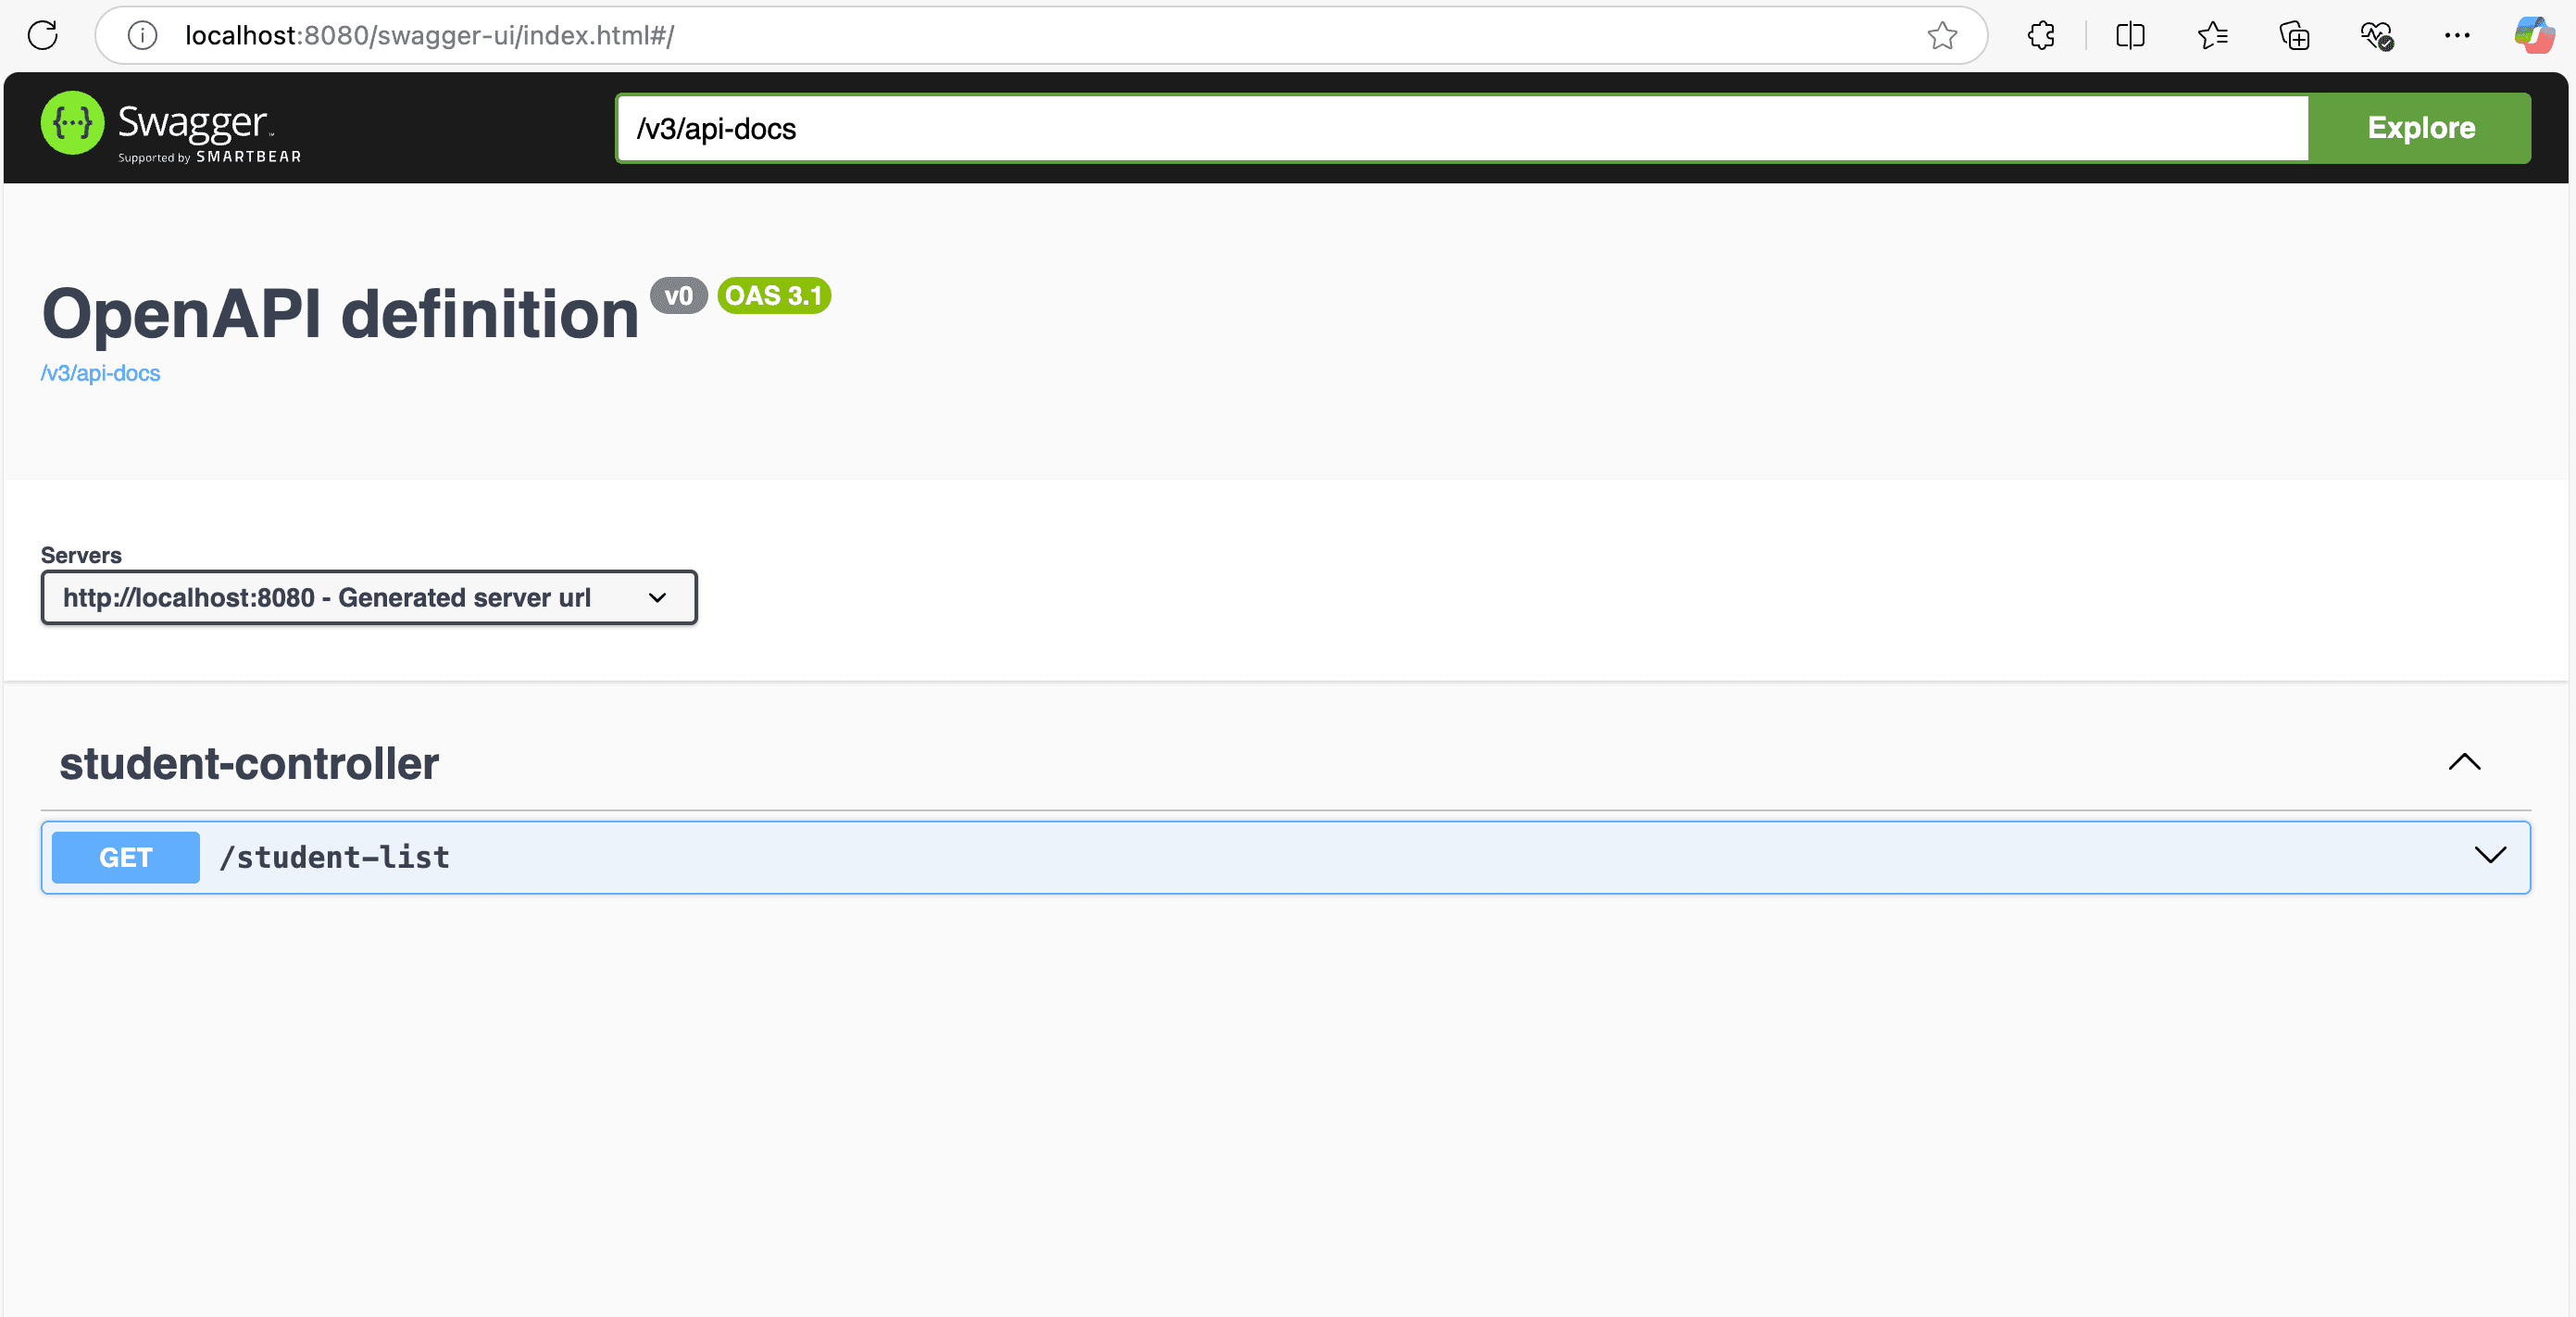
and you can use this swagger ui as your API documentation and interact with your API
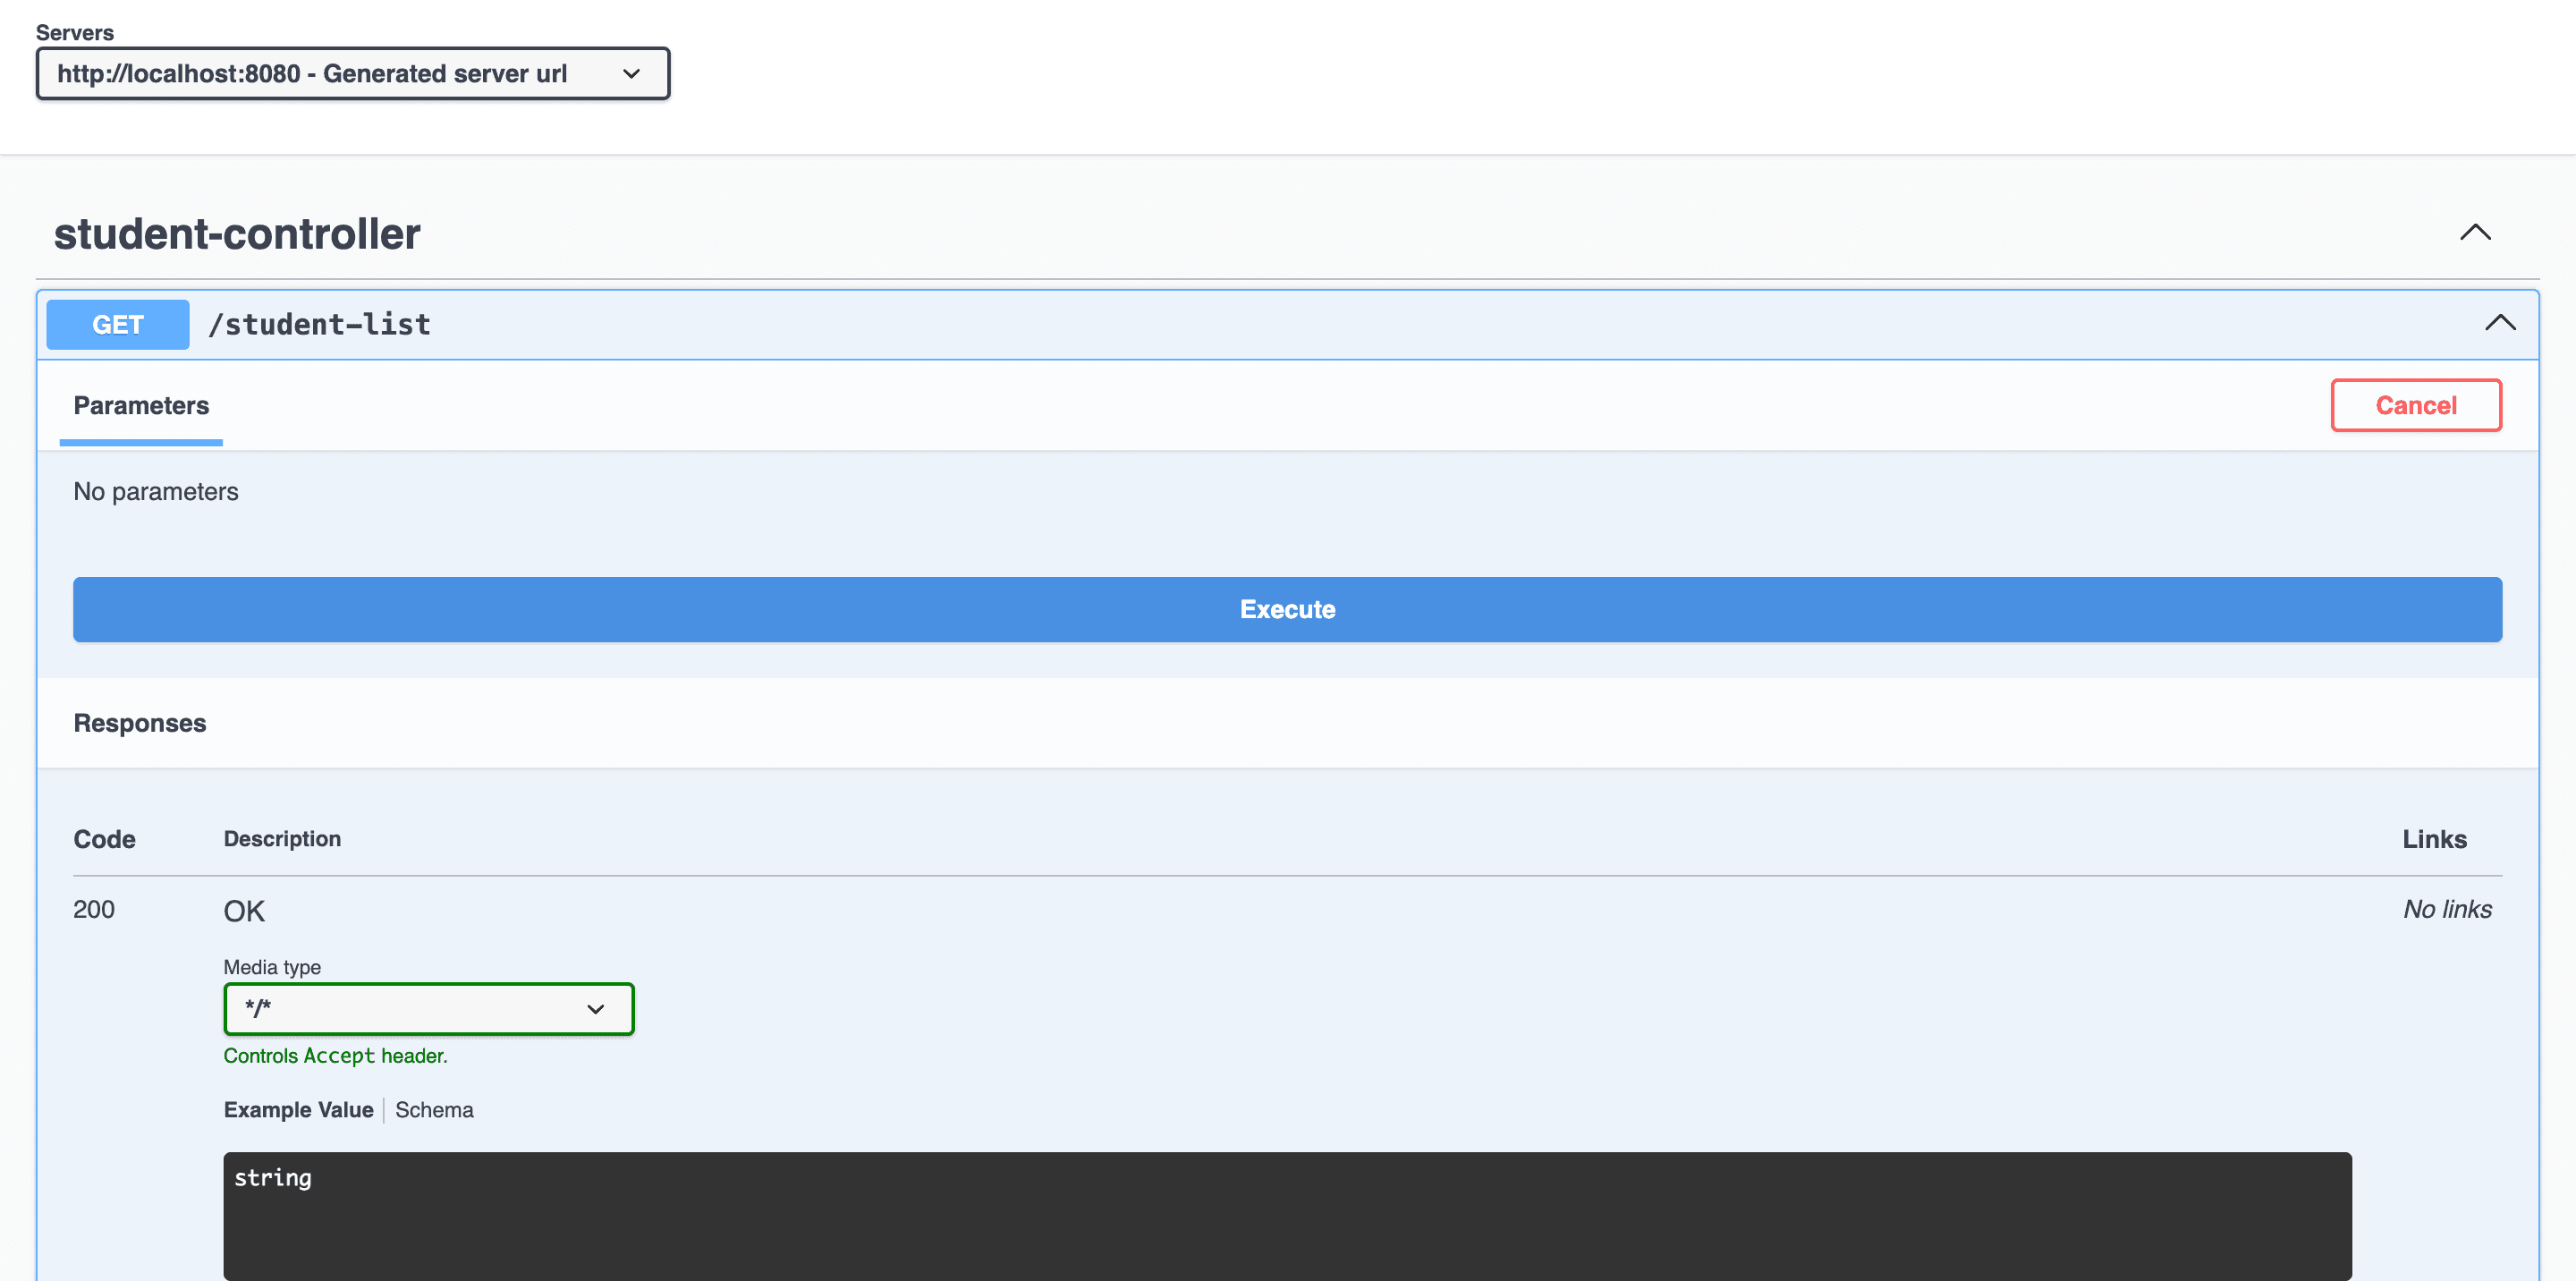
click button Try it out

click button Execute
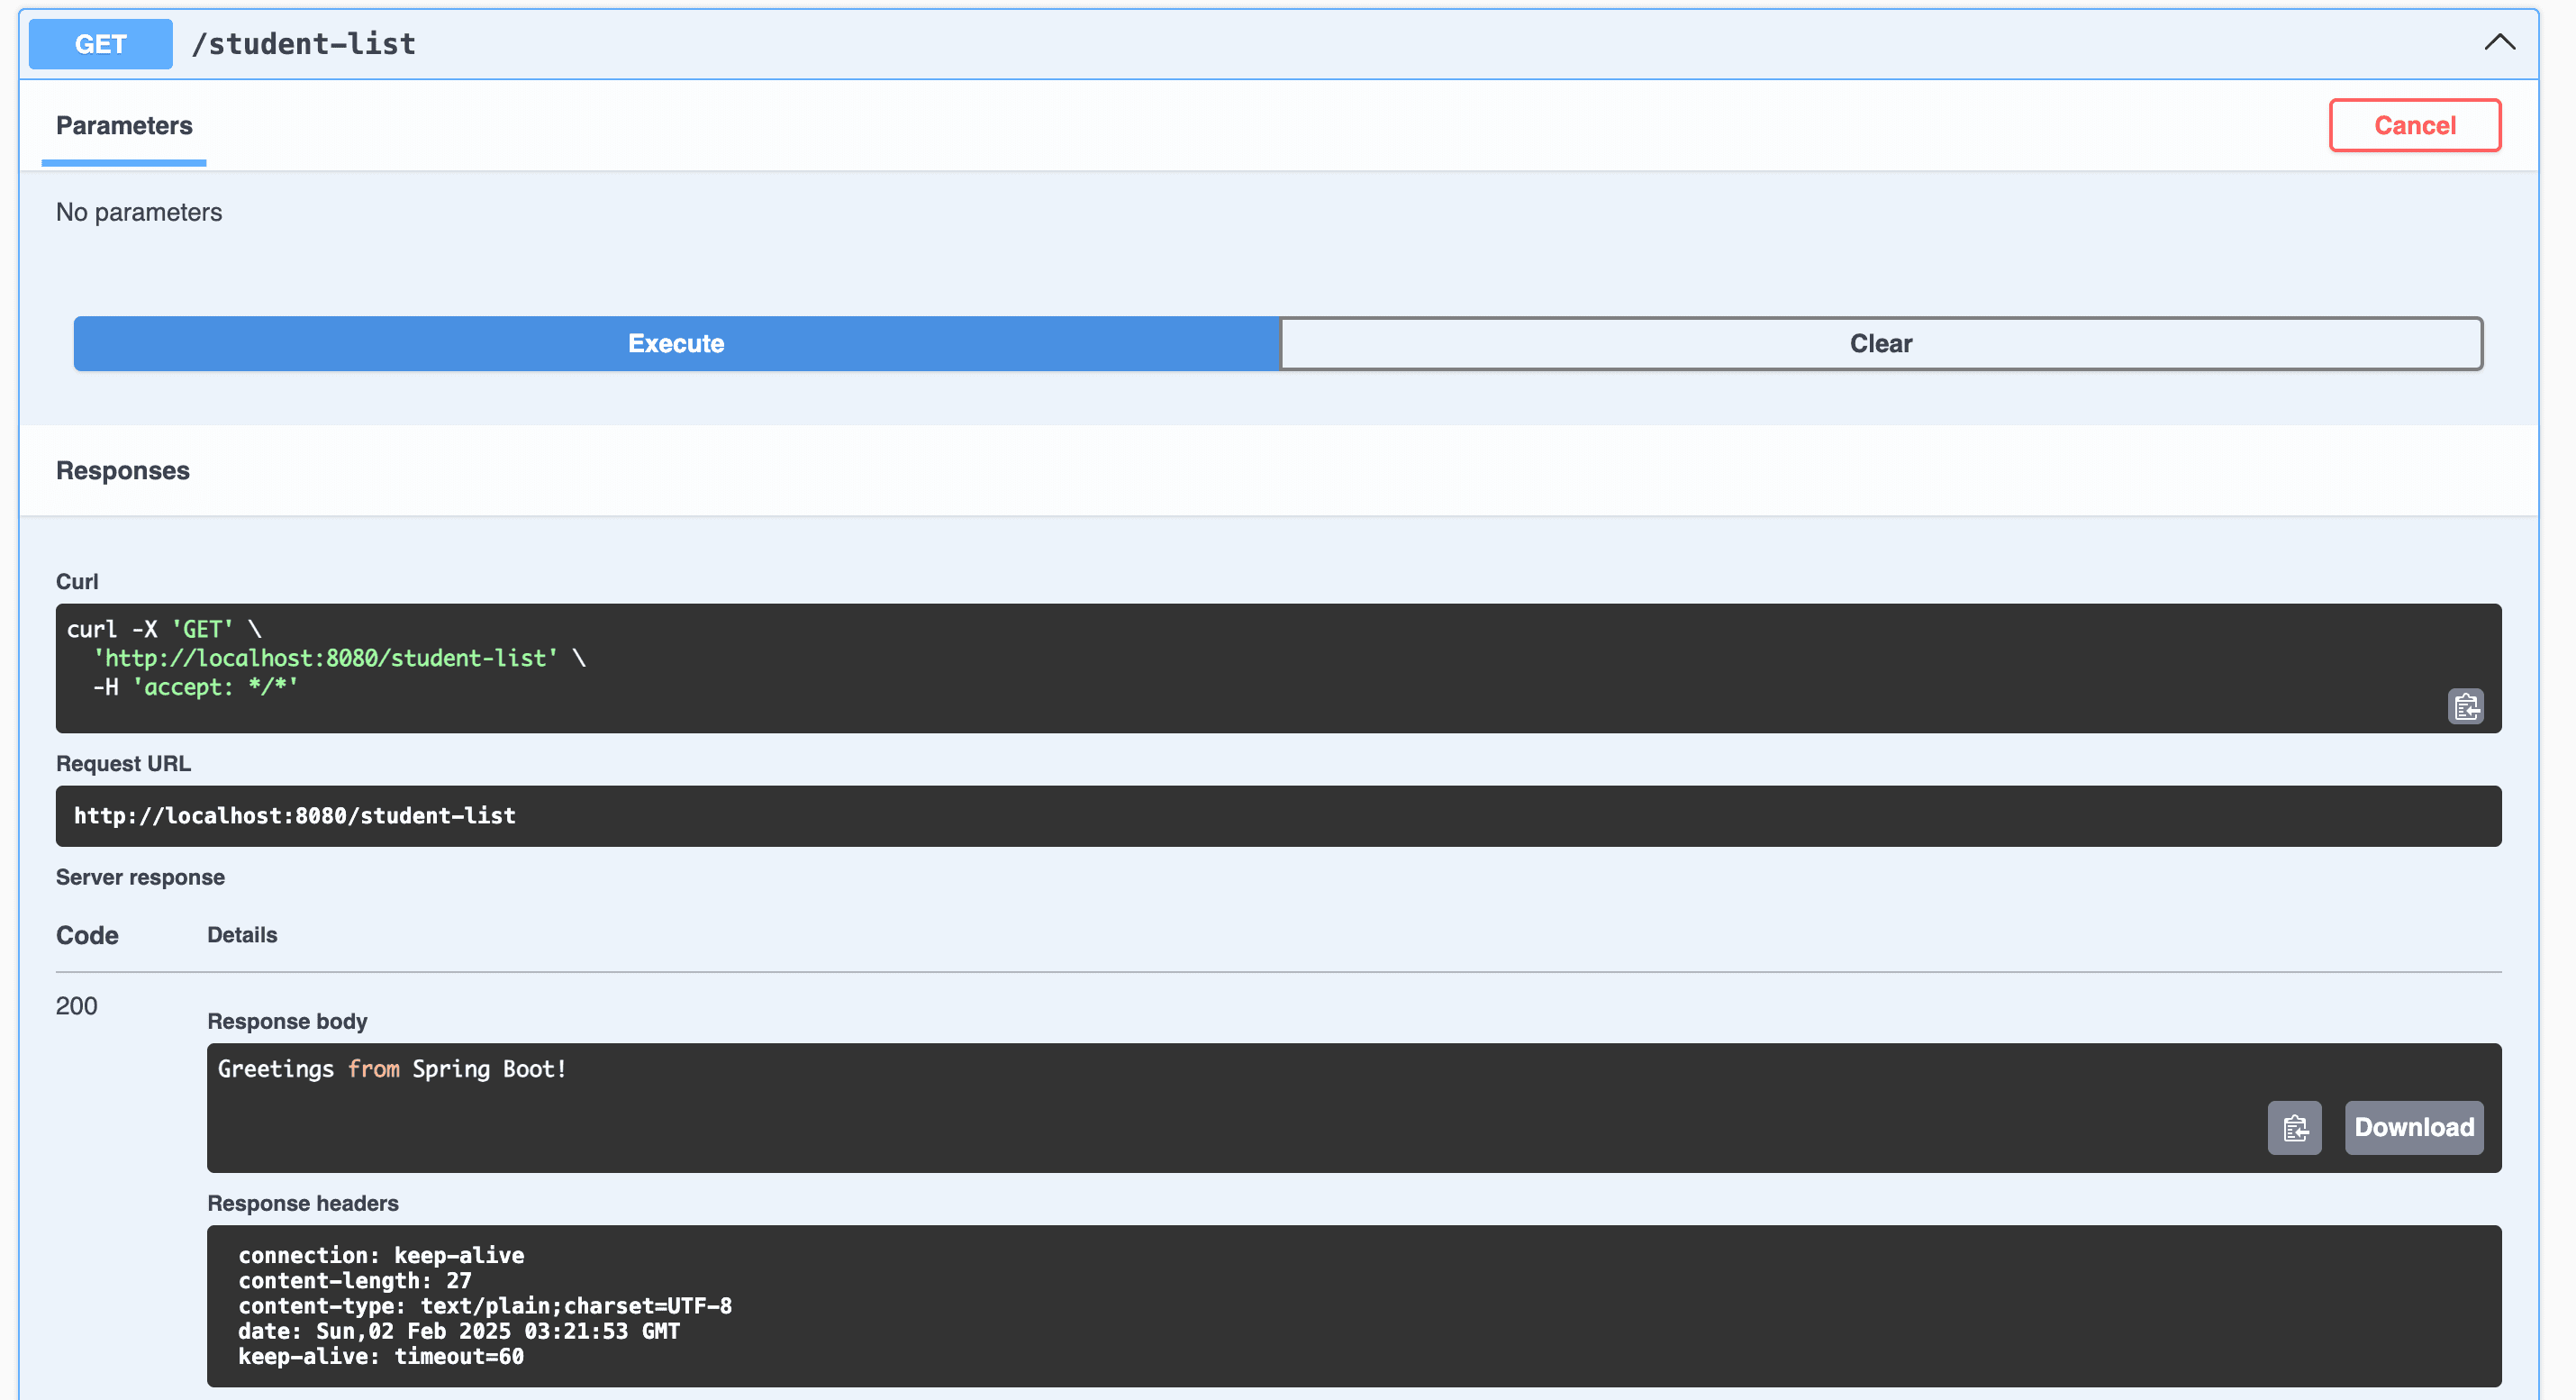
the result are like this (see the response body)
Create Entity and JPA Repository
Now you can create a entity, as the following listing (from src/main/kotlin/com/example/springkotlin/StudentData.kt) shows:
@Entity
@Table(name = "student")
data class StudentData (

    @Id
    @GeneratedValue(strategy= GenerationType.IDENTITY)
    @Column(name = "id")
    val id: Int? = null,

    @Column(name = "full_name")
    val fullName: String?,

    @Column(name = "nick_name")
    val nickName: String?,

    @Column(name = "email")
    val email: String?,

    @Column(name = "address")
    val address: String?,

    @Column(name = "city")
    val city: String?,

    @CreationTimestamp
    @Column(name = "created_at")
    val createdAt: OffsetDateTime? = null,

    @Column(name = "created_by")
    val createdBy: String?,

    @UpdateTimestamp
    @Column(name = "updated_at")
    val updatedAt: OffsetDateTime? = null,

    @Column(name = "updated_by")
    val updatedBy: String?,
)
Now you can create a repository, as the following listing (from src/main/kotlin/com/example/springkotlin/StudentDataRepository.kt) shows:
@Repository
interface StudentDataRepository : JpaRepository<StudentData, Int> {

    fun findByEmail(email: String?): List<StudentData>?

}
and create the DTO for create student request body
@JsonIgnoreProperties(ignoreUnknown = true)
data class CreateStudentRequest (
    @field:NotNull
    @field:NotBlank
    val fullName: String?,

    @field:NotNull
    @field:NotBlank
    val nickName: String?,

    @field:NotNull
    @field:NotBlank
    val email: String?,

    @field:NotNull
    @field:NotBlank
    val address: String?,

    @field:NotNull
    @field:NotBlank
    val city: String?
)
and create a configuration class (src/main/kotlin/com/example/springkotlin/config/AppConfig.kt)
@Configuration
class AppConfig {

    @Bean
    fun validator(): LocalValidatorFactoryBean {
        return LocalValidatorFactoryBean()
    }

}
Let's update the controller code
@RestController
class StudentController @Autowired constructor(
    private val studentDataRepository: StudentDataRepository
) {

    @GetMapping("/student-list")
    fun getAllStudent(): List<StudentData> {
        return studentDataRepository.findAll()
    }

    @GetMapping("/student/{studentId}")
    fun getStudentById(@PathVariable studentId: Int): StudentData? {
        return studentDataRepository.findById(studentId).orElse(null)
    }

    @GetMapping("/student")
    fun getStudentByEmail(@RequestParam email: String): List<StudentData>? {
        return studentDataRepository.findByEmail(email);
    }

    @PostMapping("/student")
    fun createStudent(@Valid @RequestBody request: CreateStudentRequest): StudentData? {
        val studentData = StudentData(
            fullName = request.fullName,
            nickName = request.nickName,
            email = request.email,
            address = request.address,
            city = request.city,
            createdAt = OffsetDateTime.now(),
            createdBy = "admin",
            updatedAt = OffsetDateTime.now(),
            updatedBy = "admin"
        )

        return studentDataRepository.saveAndFlush(studentData);
    }
}
and re run the app by click the play button.
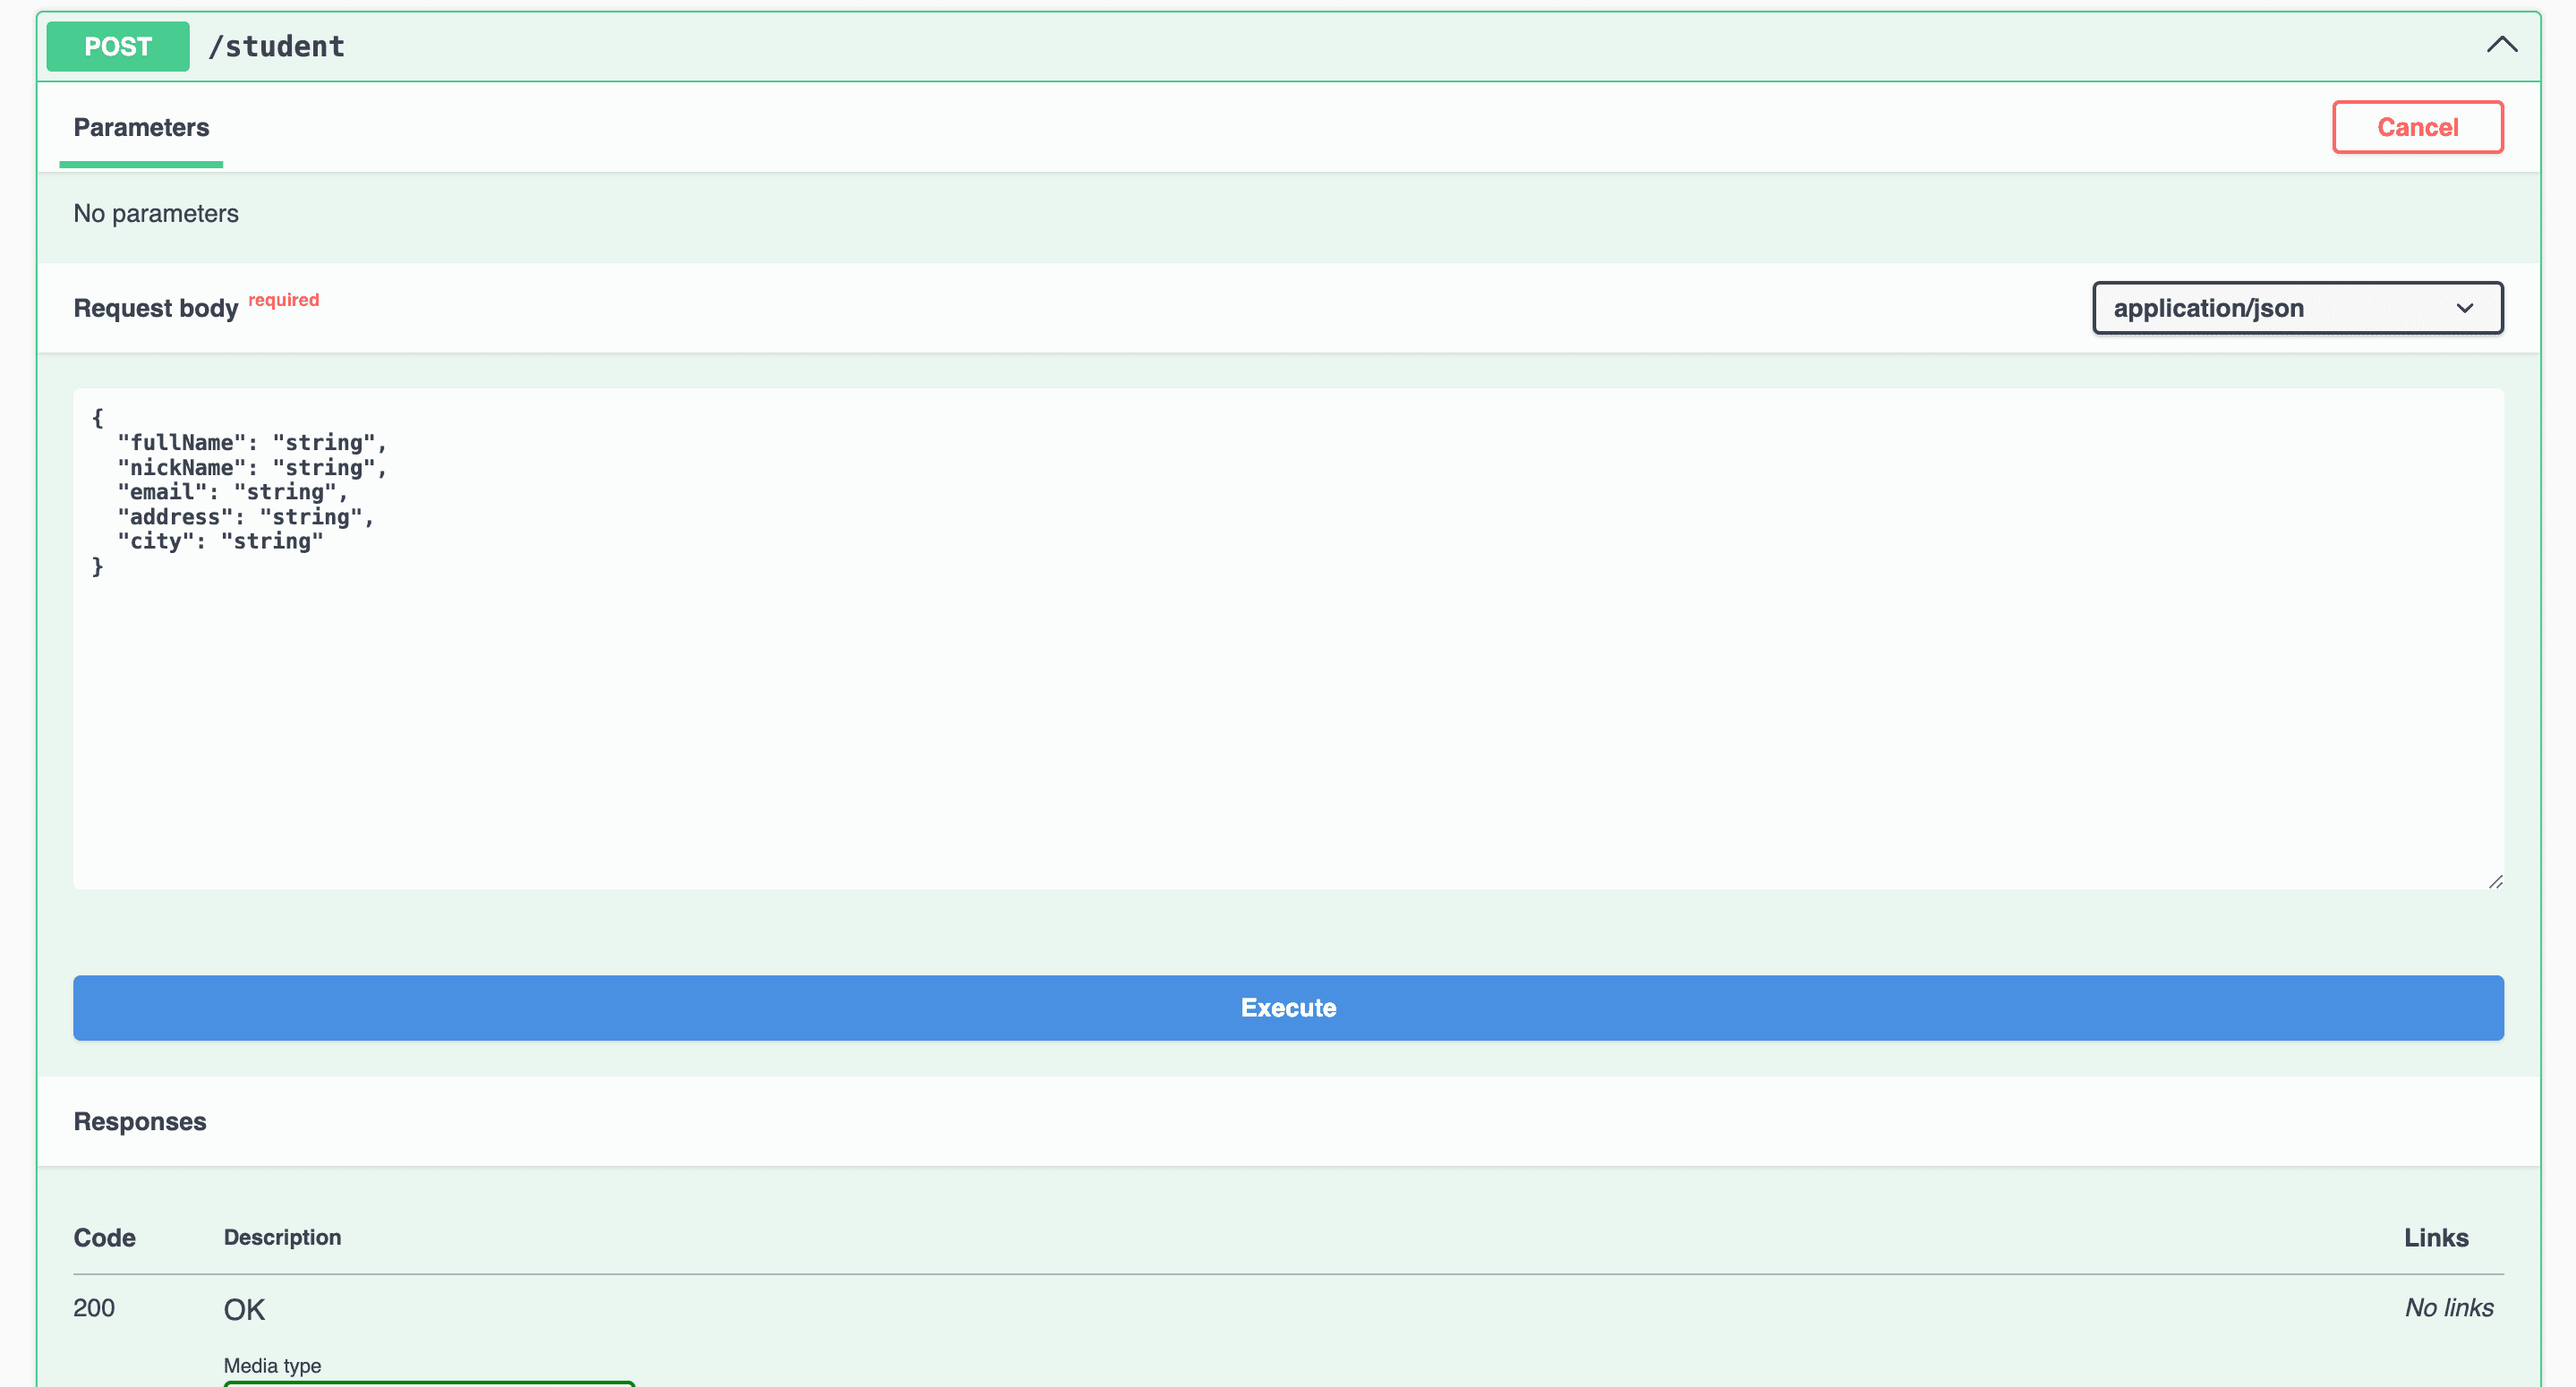
now open again your swagger-ui and expand the POST /student
and execute it

and then use the GET /student/{studentId}

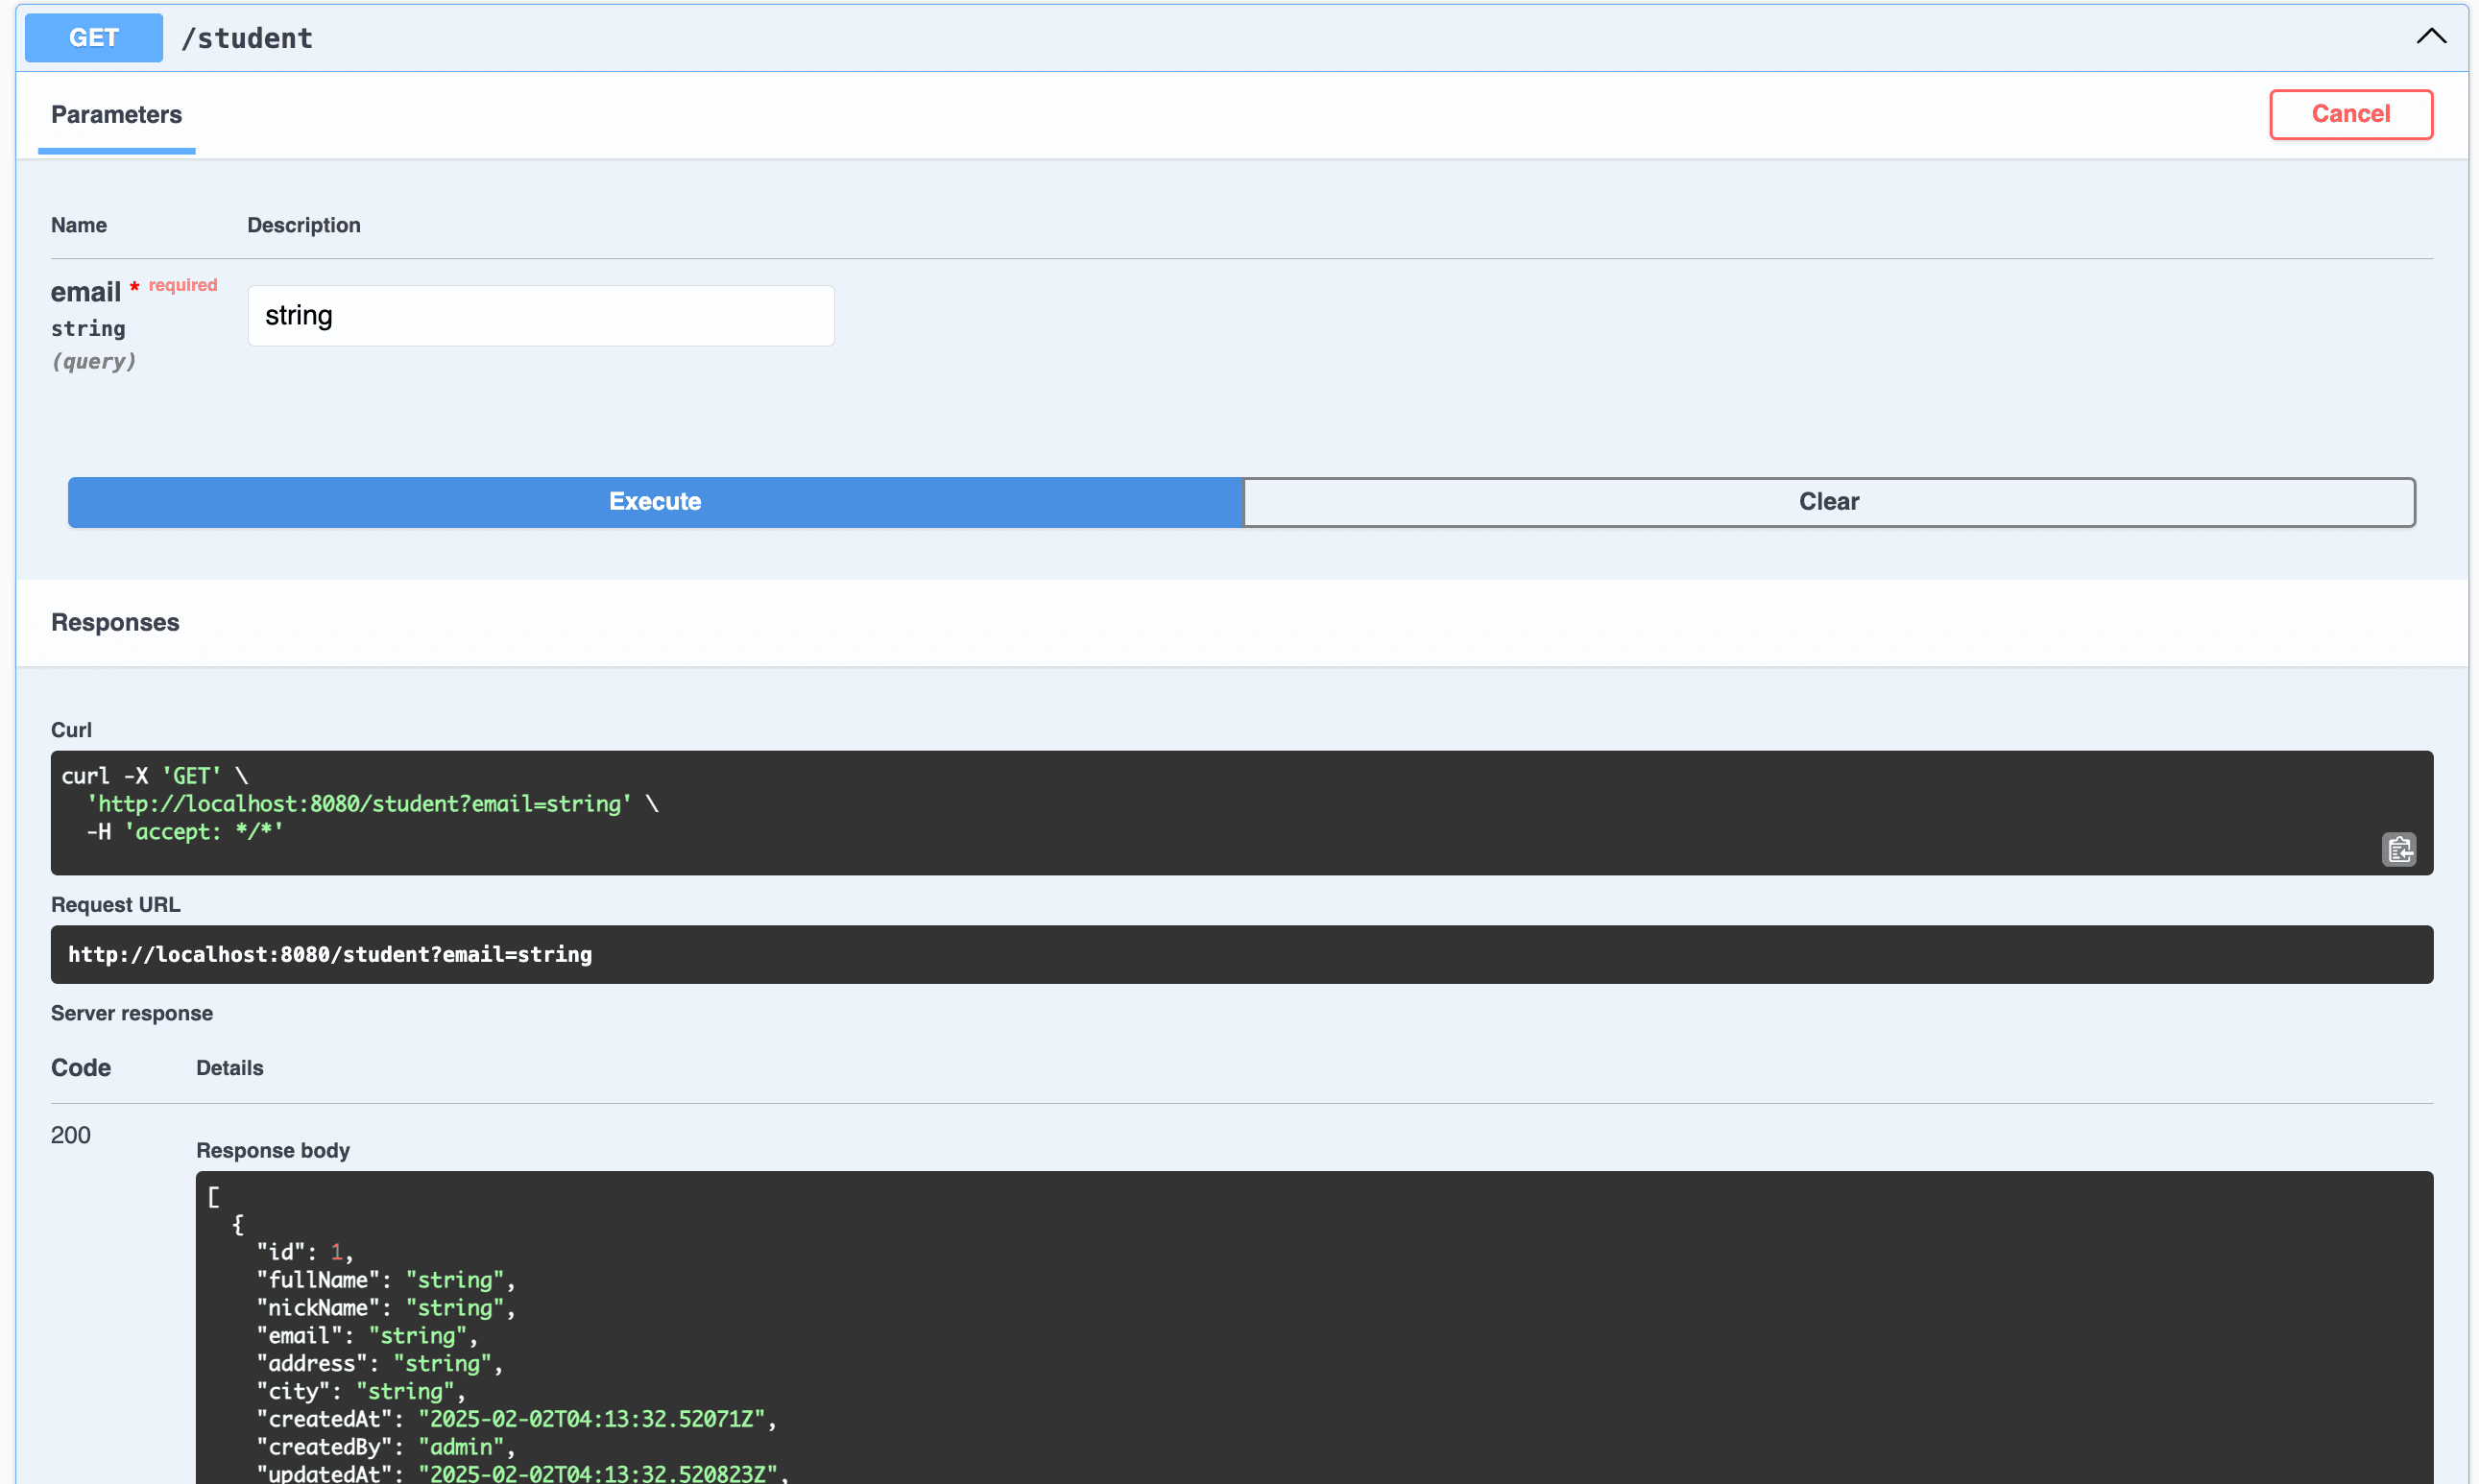
and then use the GET /student?email=string
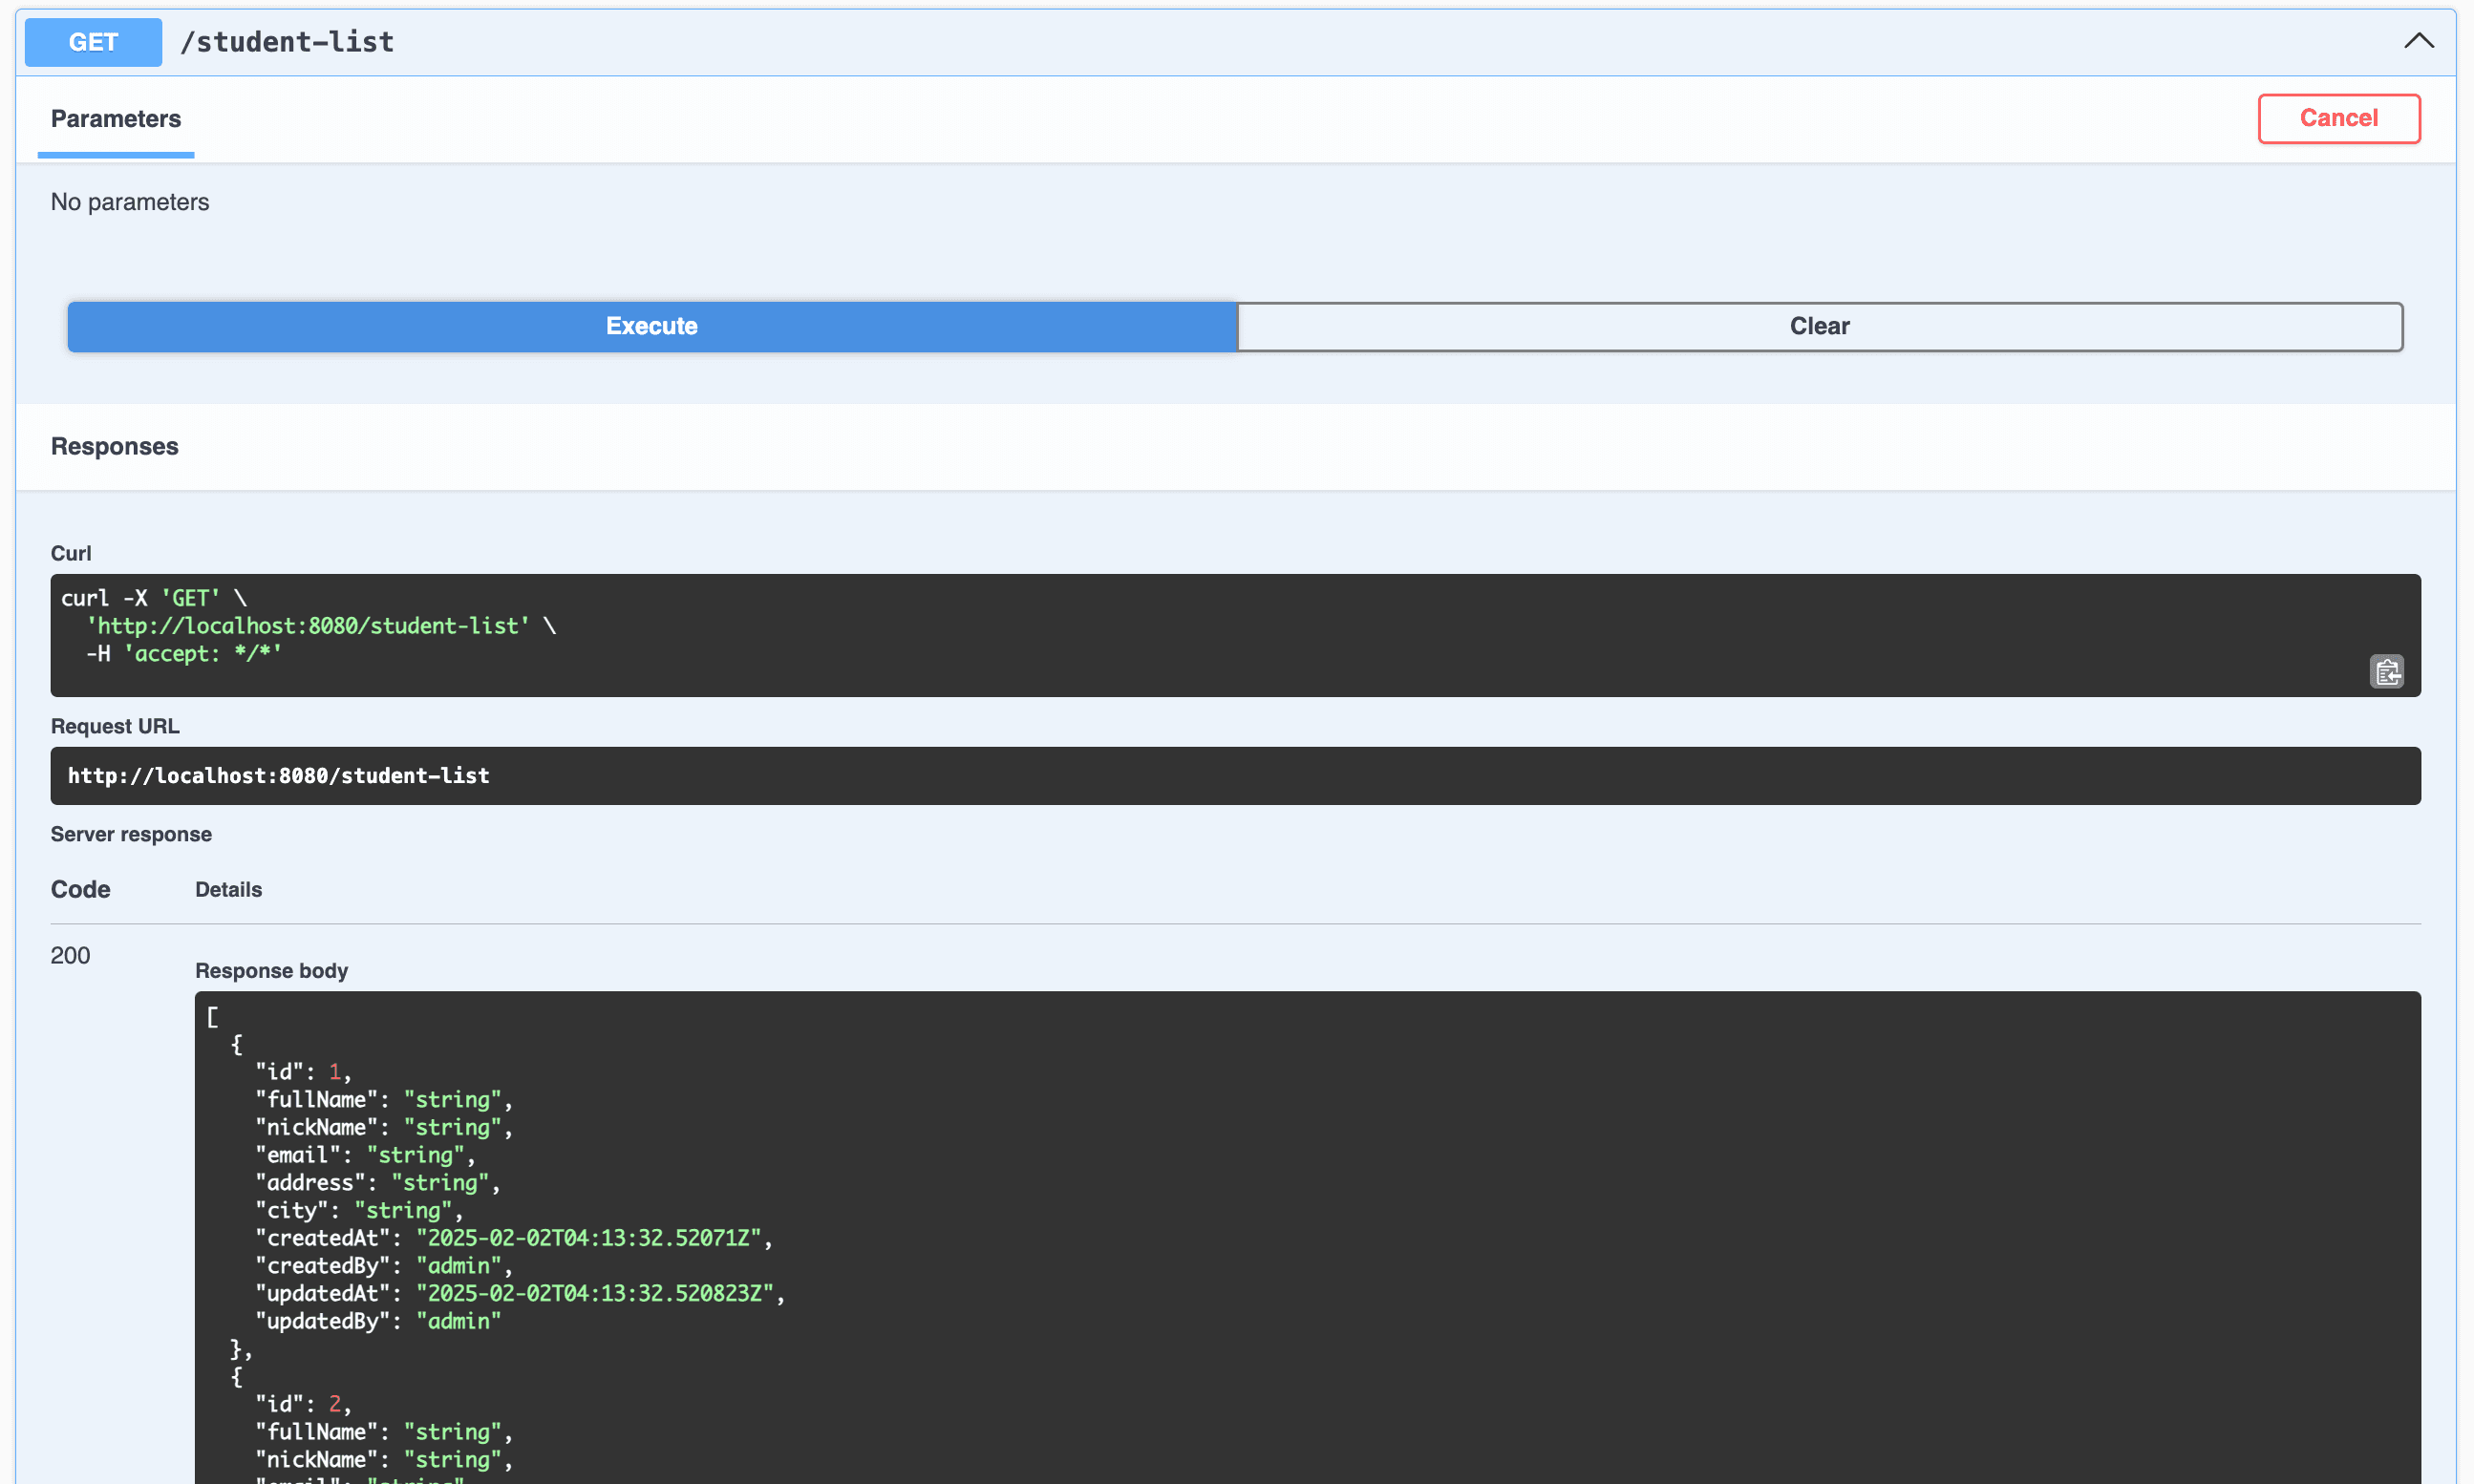
and then use the GET /student-list
Summary
Congratulations! You have just developed a Kotlin Spring application that is bound to a PostgreSQL database and is ready to use! And you have taste in how to develop REST API Spring Boot applications.
I hope you are now understand how to use Kotlin Spring Boot to create REST API Service.
Thank you for reading and your attention. See you soon on the next post.
Challenge
I'm giving you to challenge to explore more about Kotlin Spring
- you can use
ResponseEntityin your StudentController you can useResponseEntityin kotlin like code snippet below
@GetMapping("/student-list")
fun getAllStudent(): ResponseEntity<List<StudentData>> {
    val result = studentDataRepository.findAll();
    return ResponseEntity.ok(result)
}
If you want to see the codebase please visit this GitHub: kotlin-spring-introduction
Learn more
Go learn more about